Want to add a dedicated course landing page to promote your Moodle course? In this post we will show you how to do so using Moodle’s Static Pages plugin. You can download the course landing page template to try on your site as well.
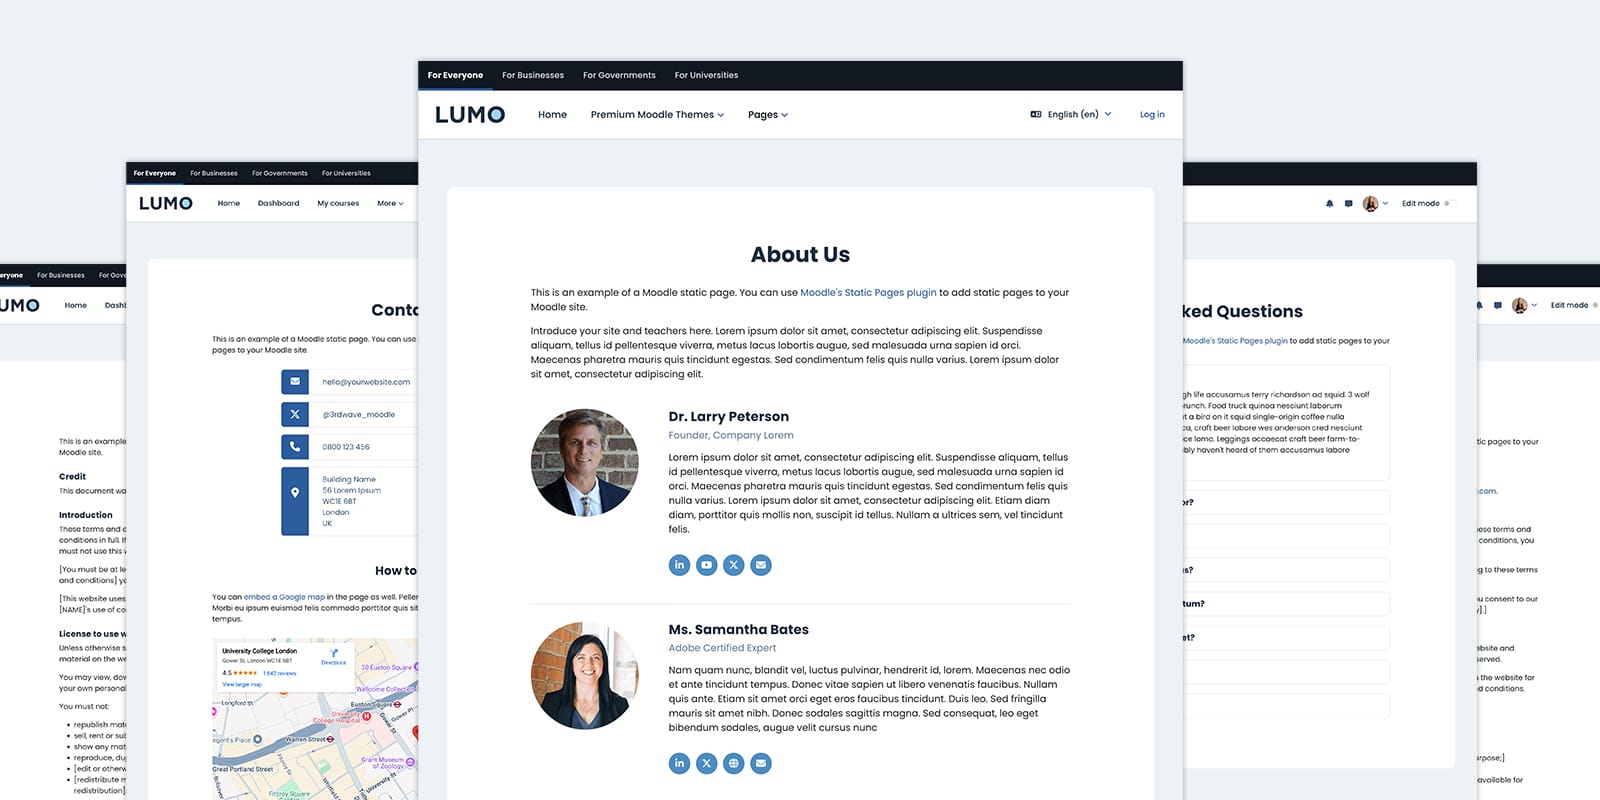
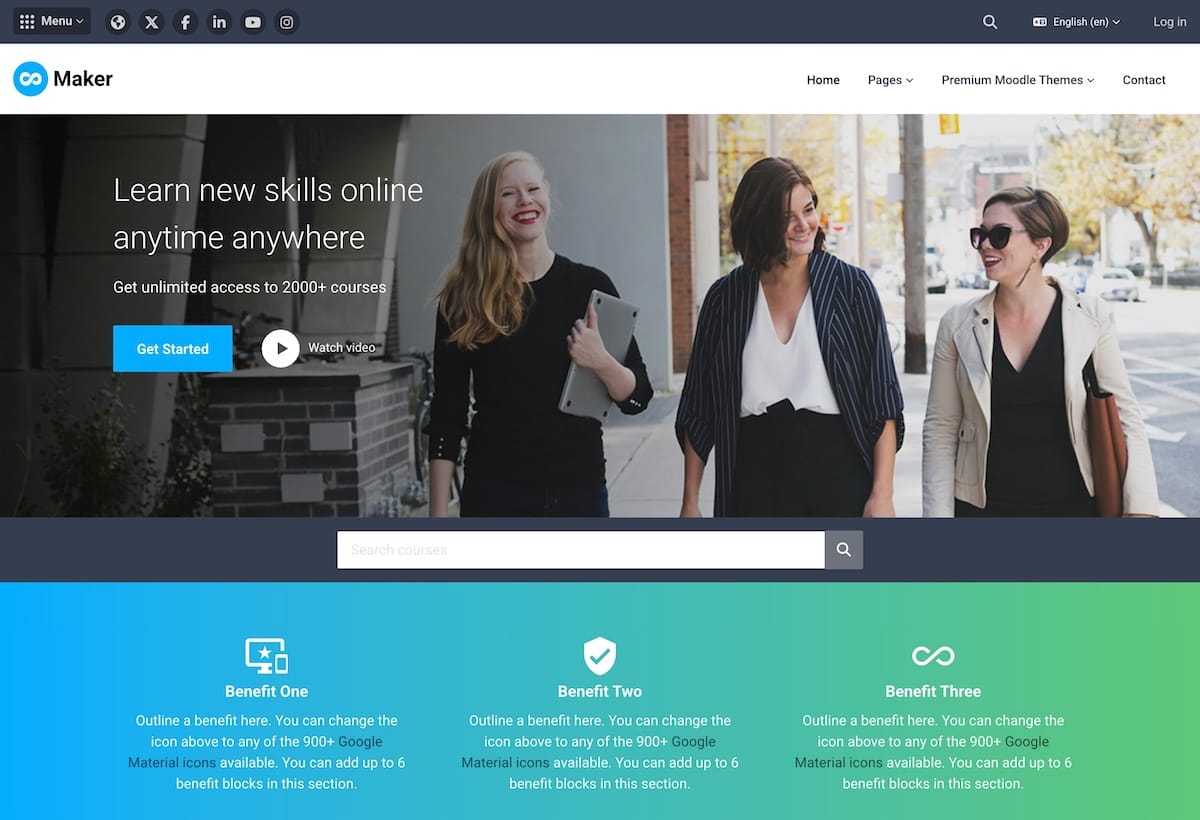
We’ve also added this landing page style to the latest versions of our premium Moodle themes – Lumo, Edutor and Maker. Check out the demo landing pages below to see how it looks in action!
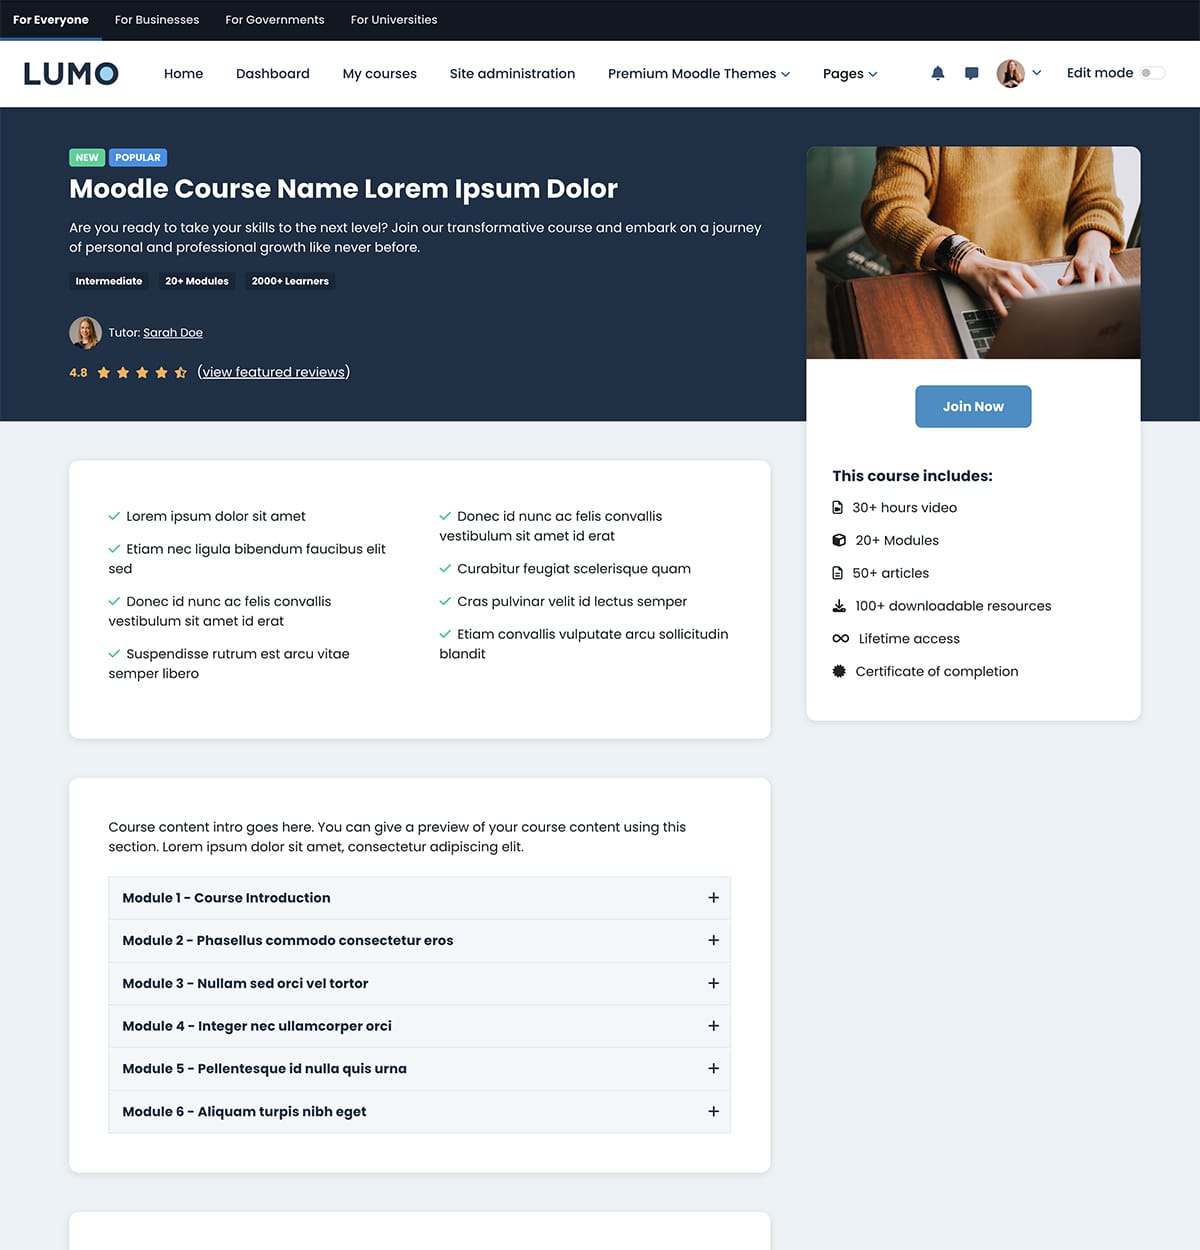
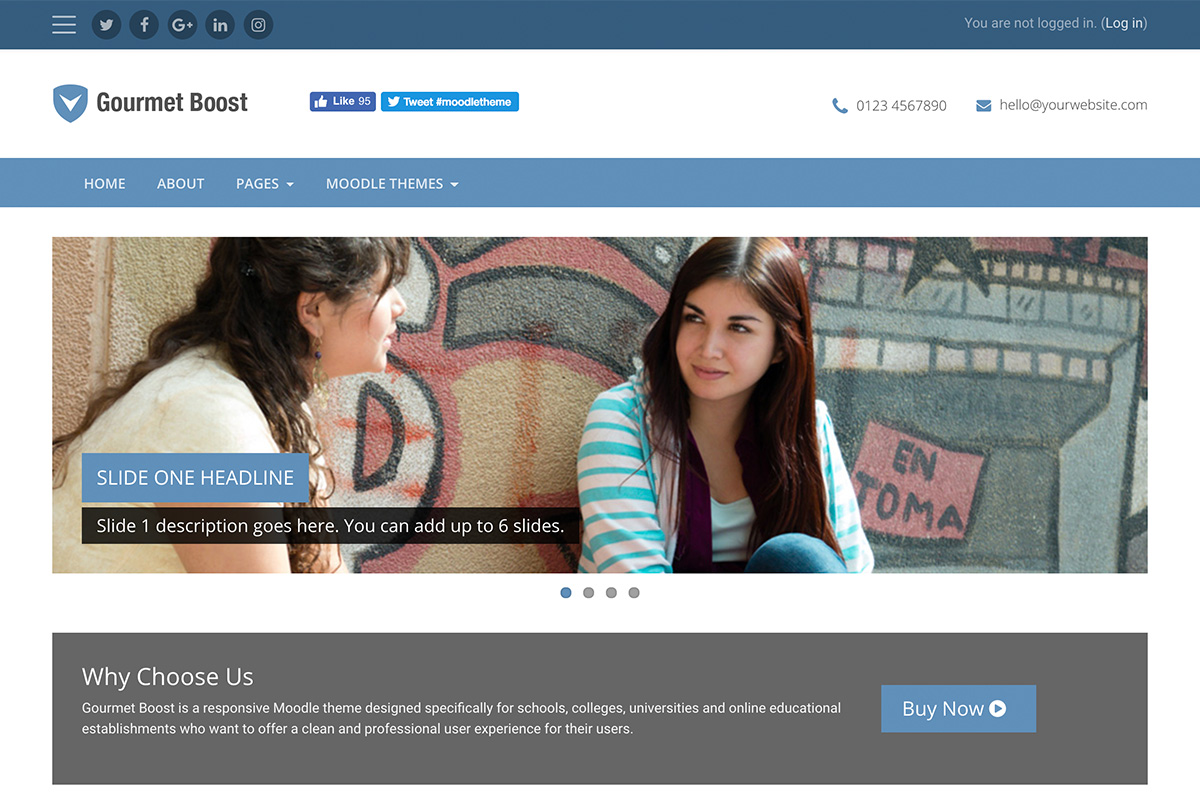
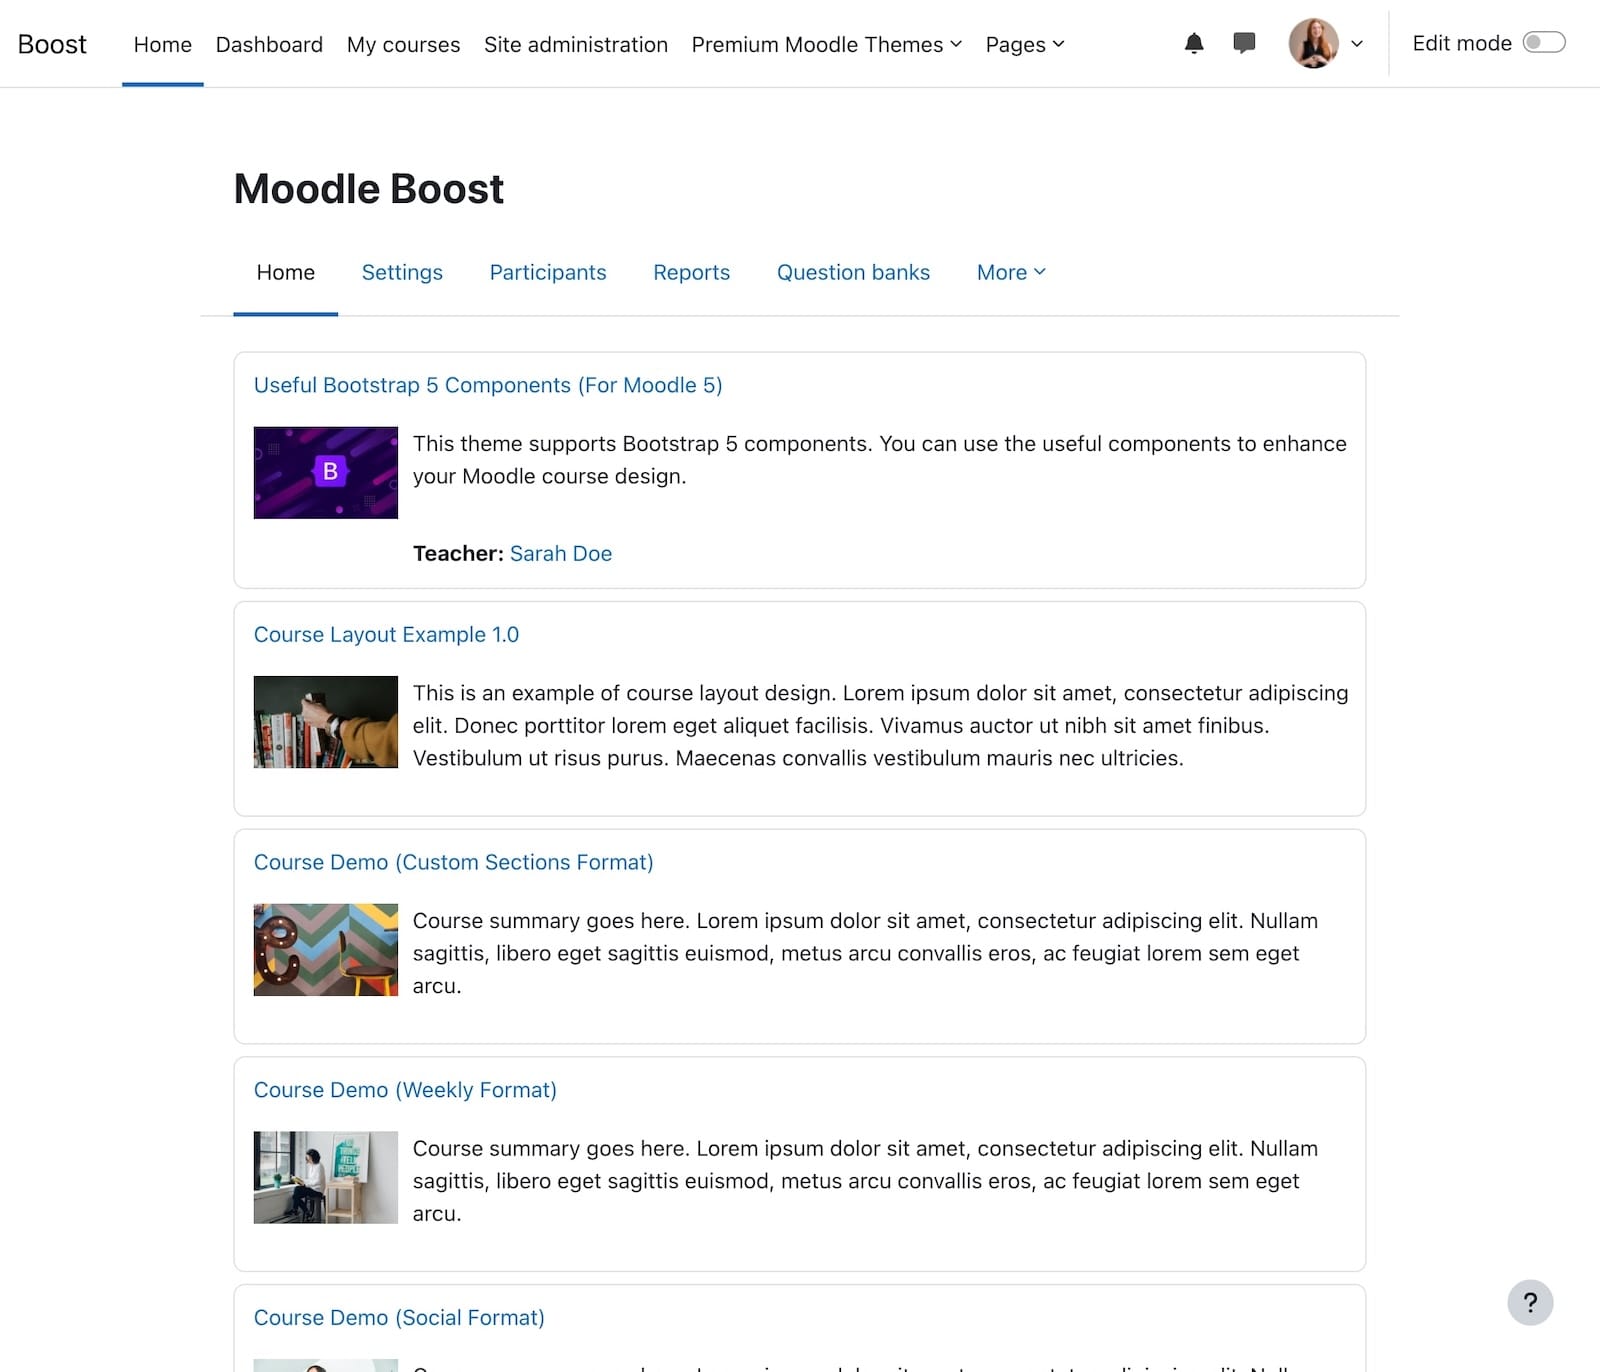
Lumo

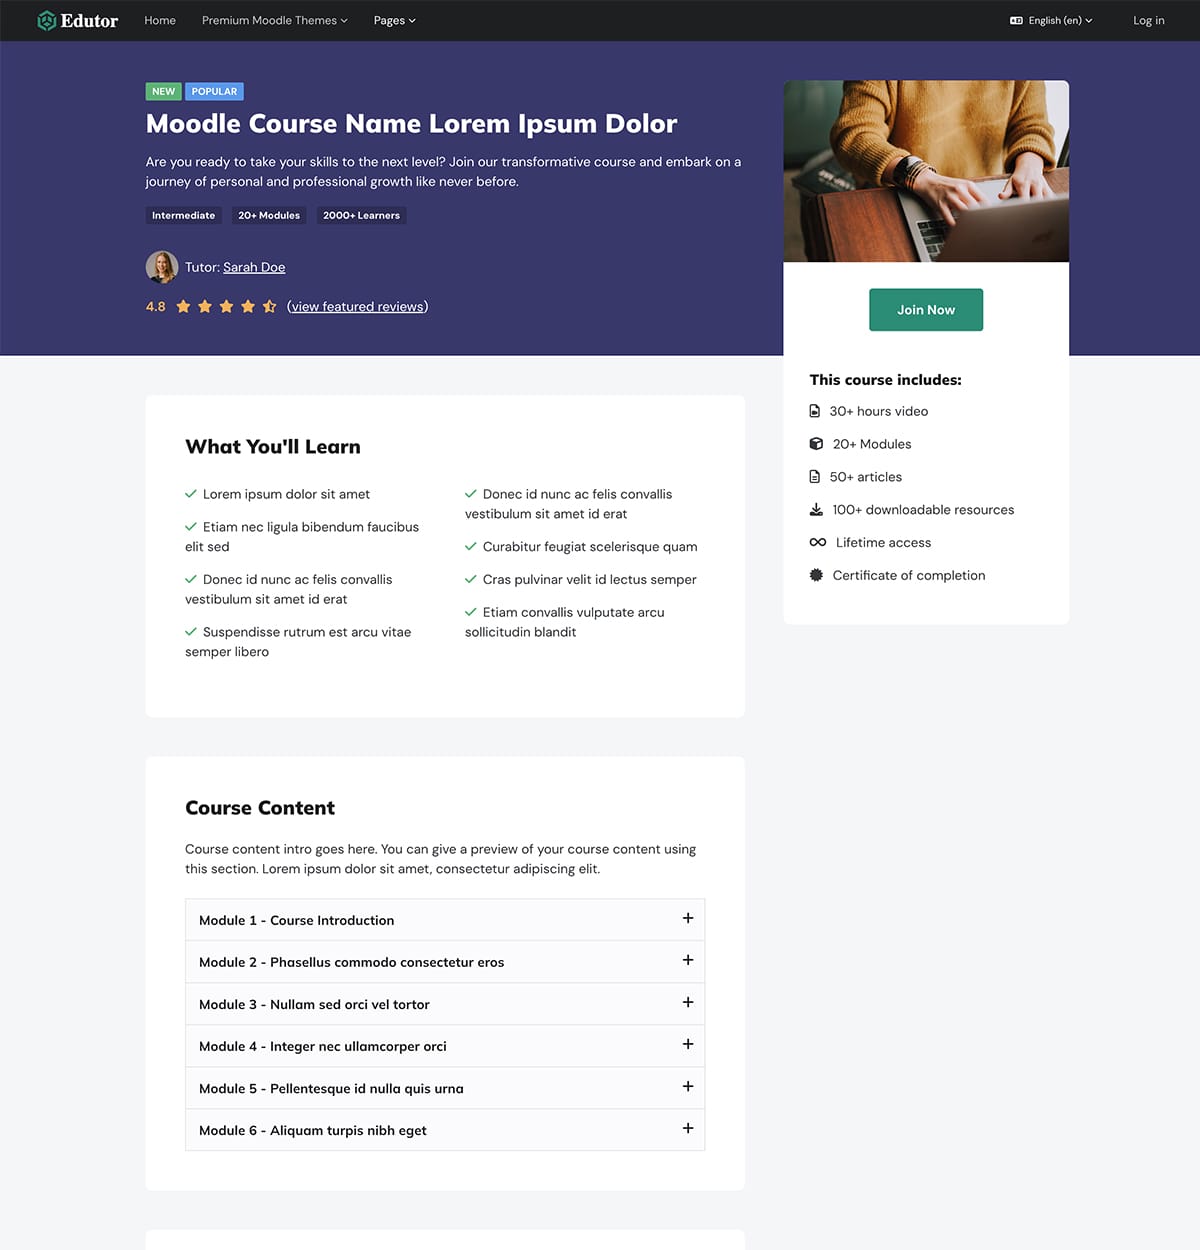
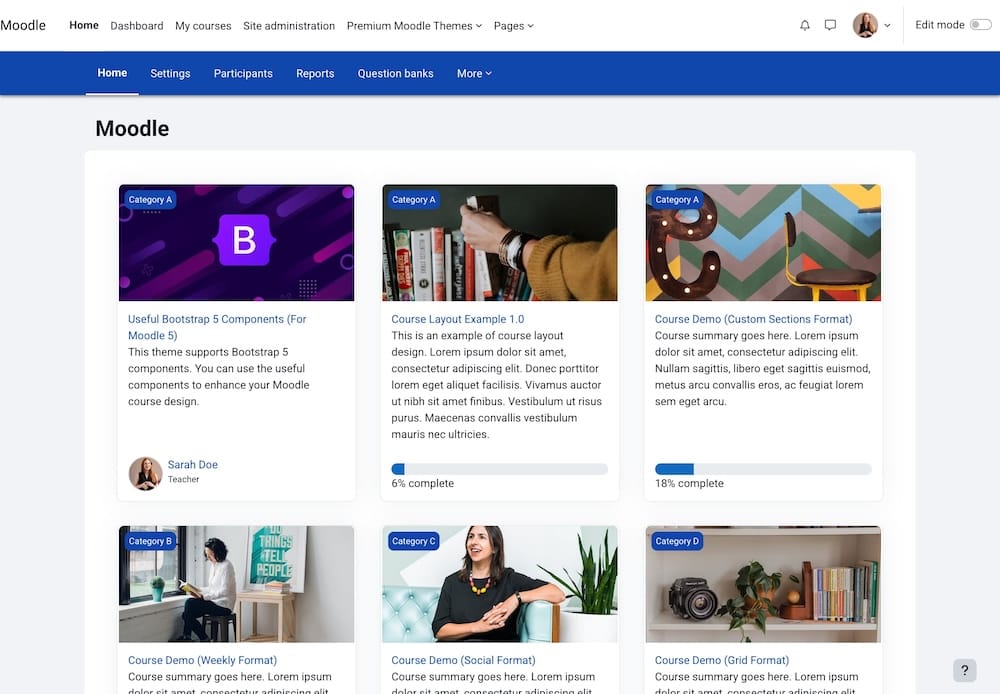
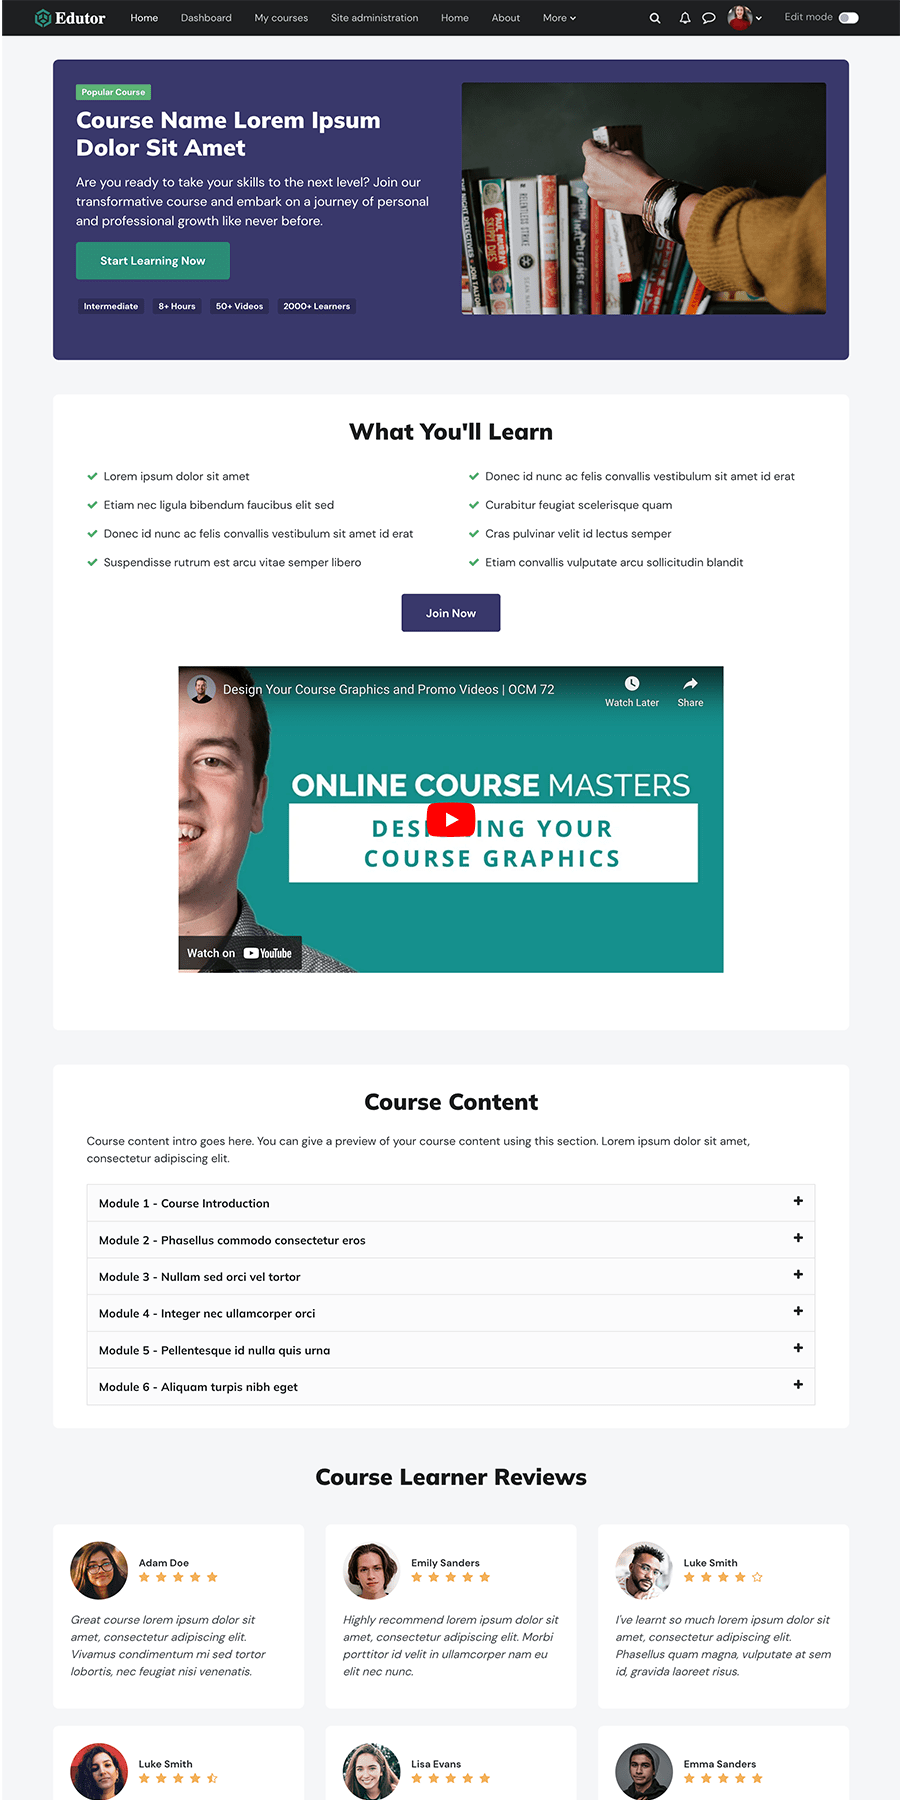
Edutor
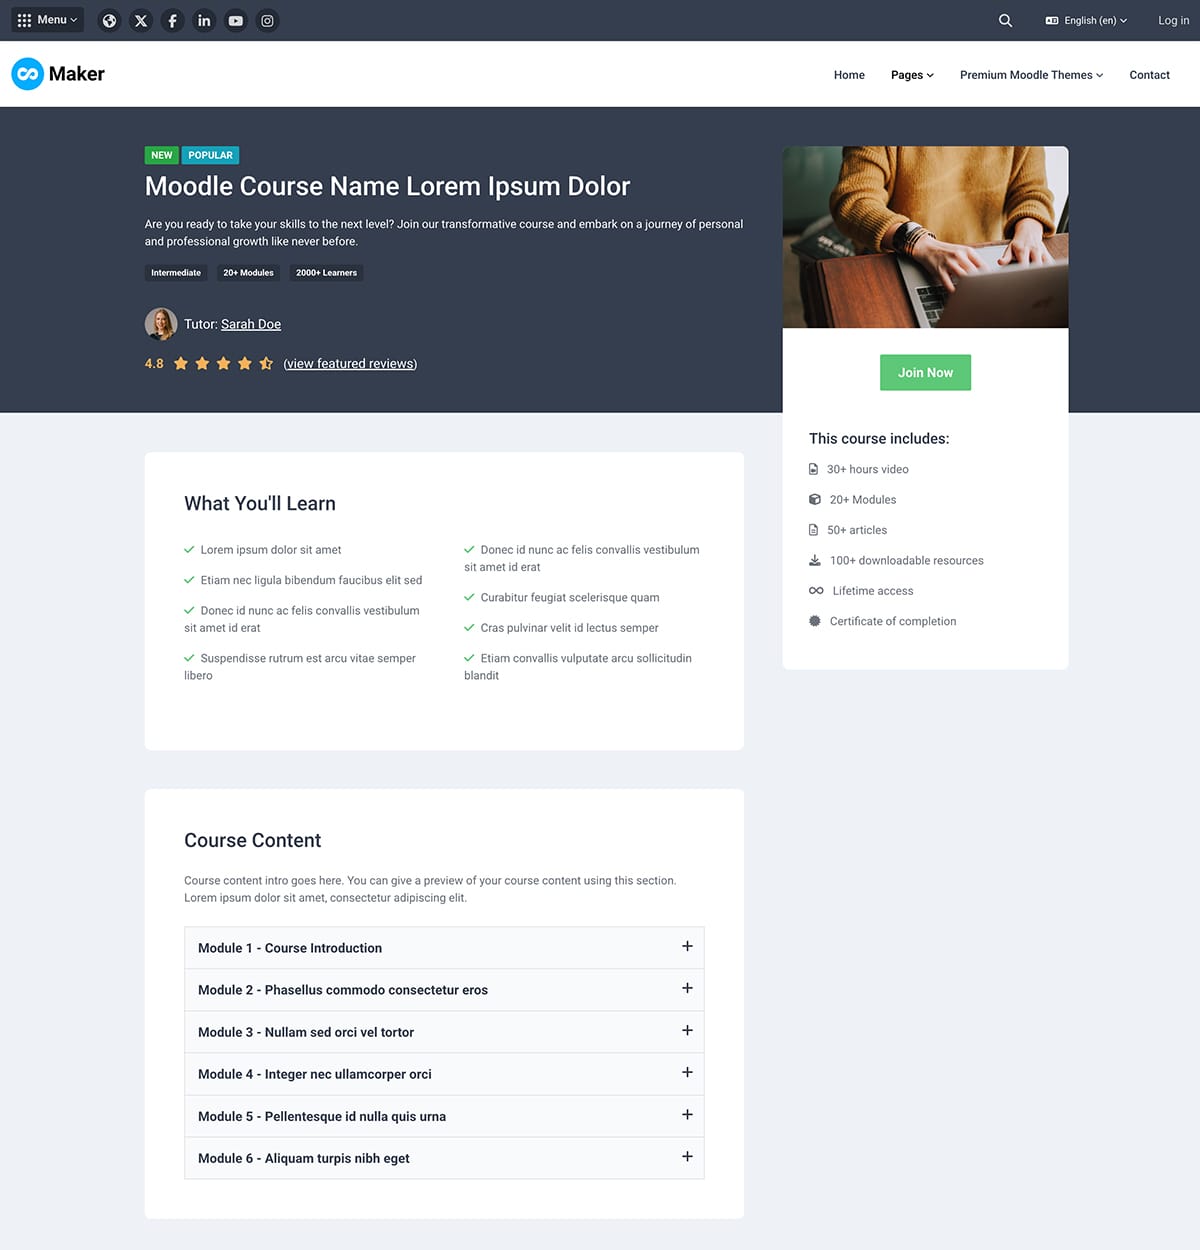
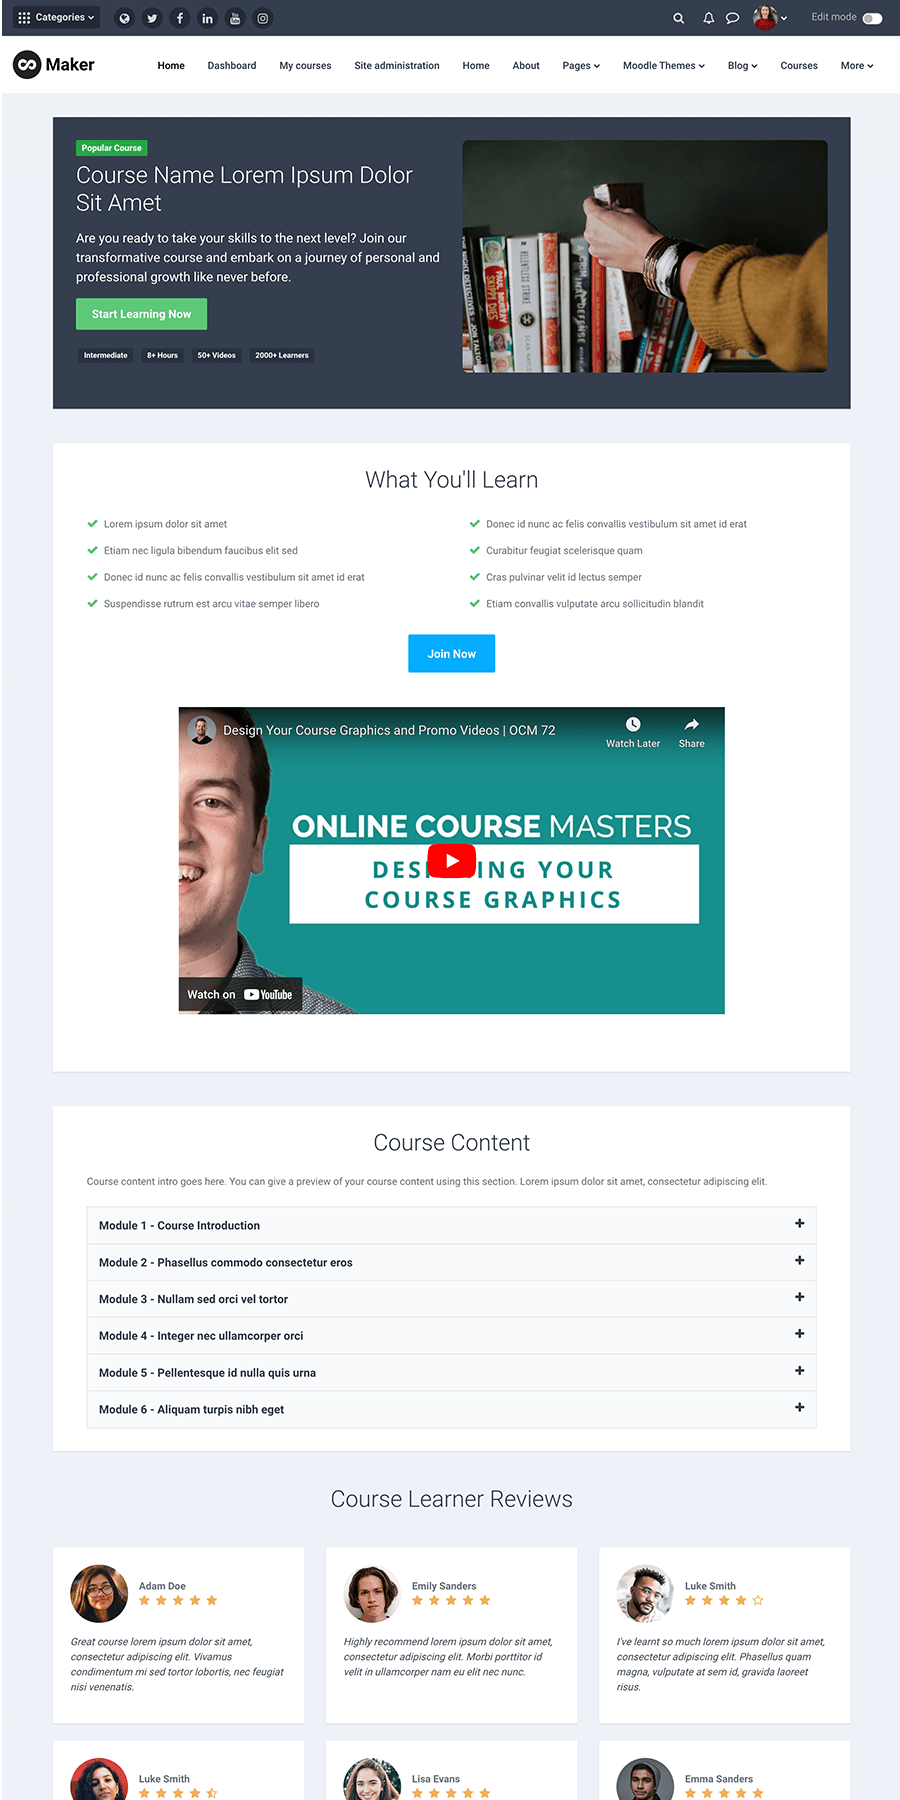
Maker
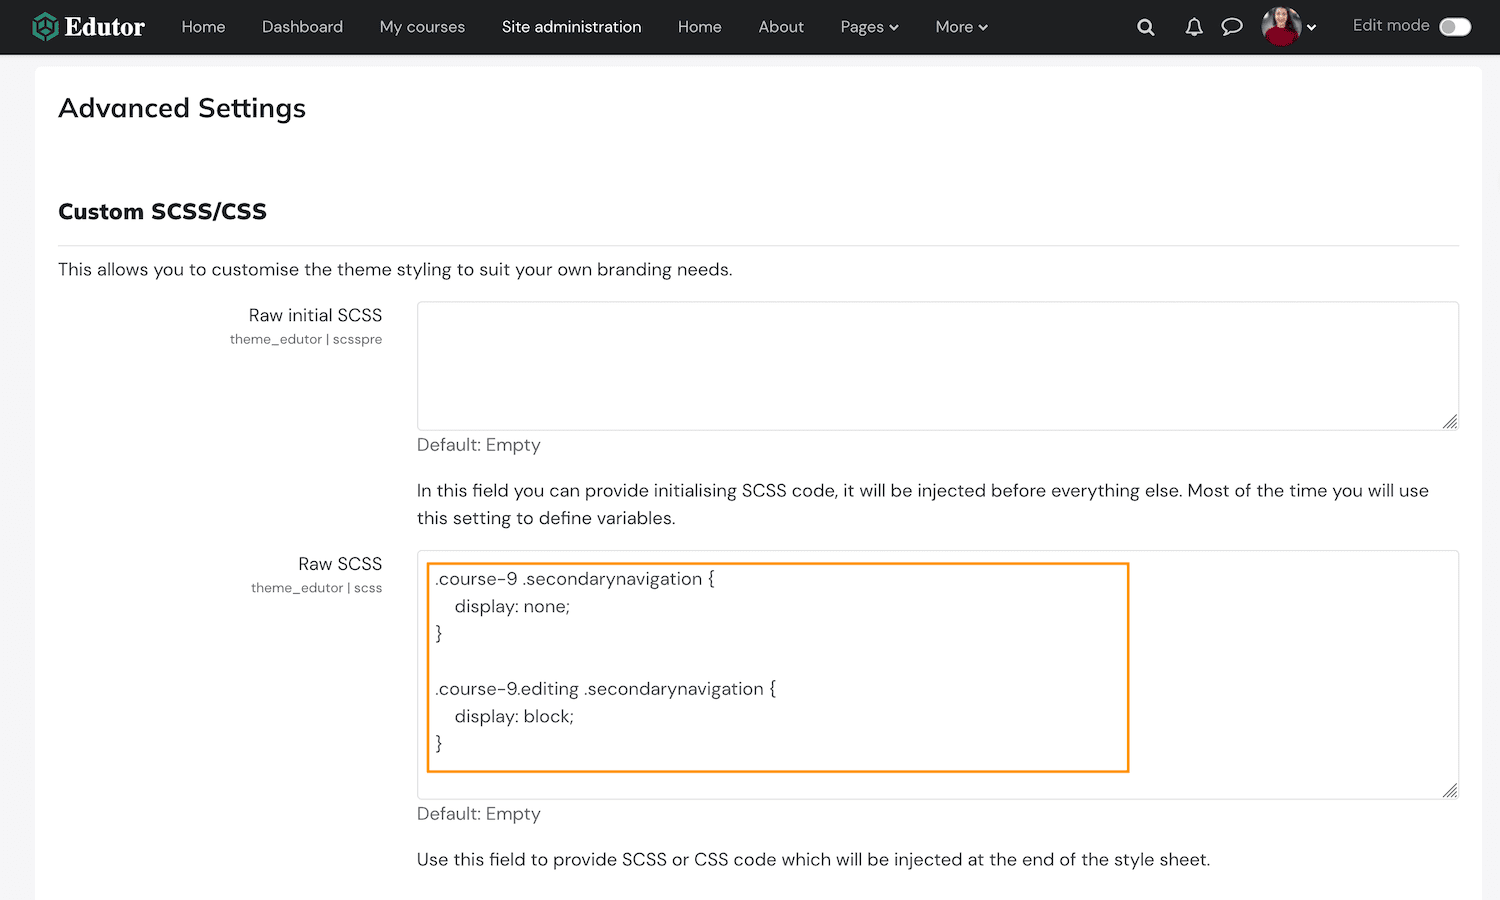
If you’re using a Boost-based Moodle theme you can style the landing page via Custom CSS.
Step 1
Download the landing page HTML template file. Open the file using a HTML editor to edit the template content to suit your needs.
For Moodle 5.x Sites
Free Download (1810 downloads)For Moodle 4.x Sites
Free Download (5971 downloads)Our template contains all of the essential sections for a winning online course landing page. All the sections are structured in a modular way so you can easily rearrange the order of the sections or remove certain sections.
Template Section Structure:
- Course Hero Section
- Course Overview Section
- Course Content Section
- Course Reviews Section
- Course Pricing Section
- Course FAQ Section
- Course Requirements Section
- Course Tutor Section
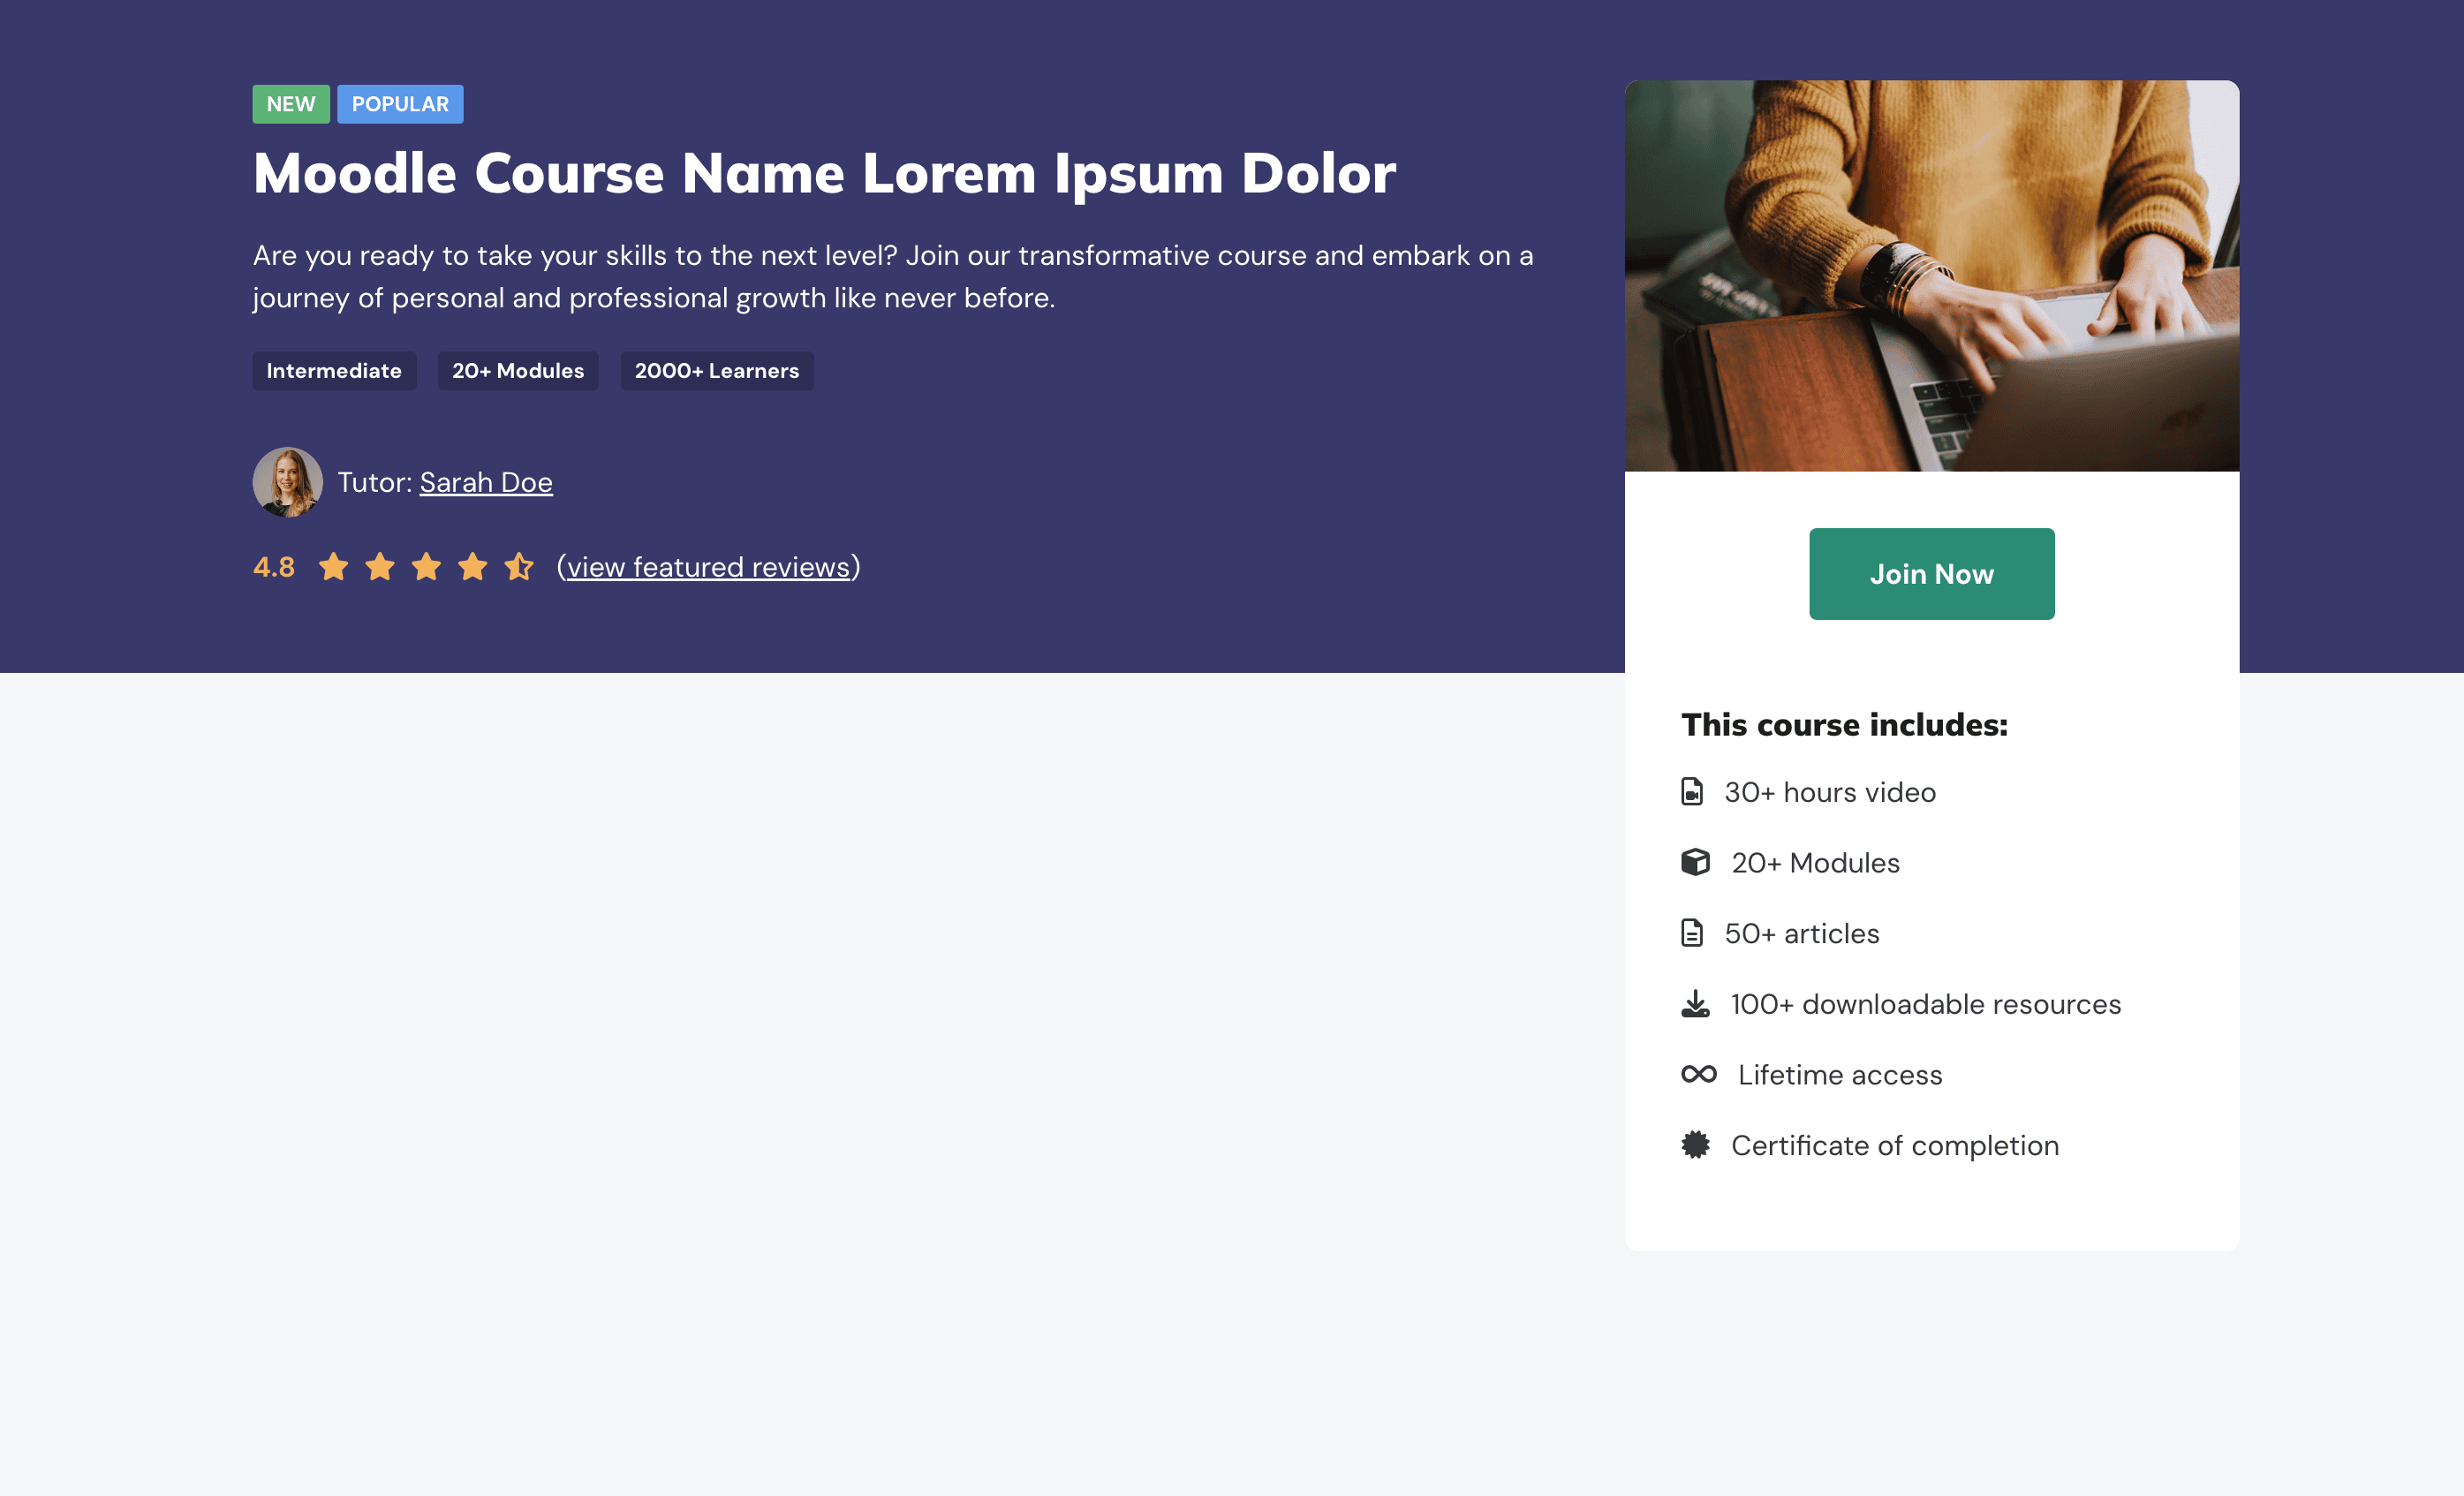
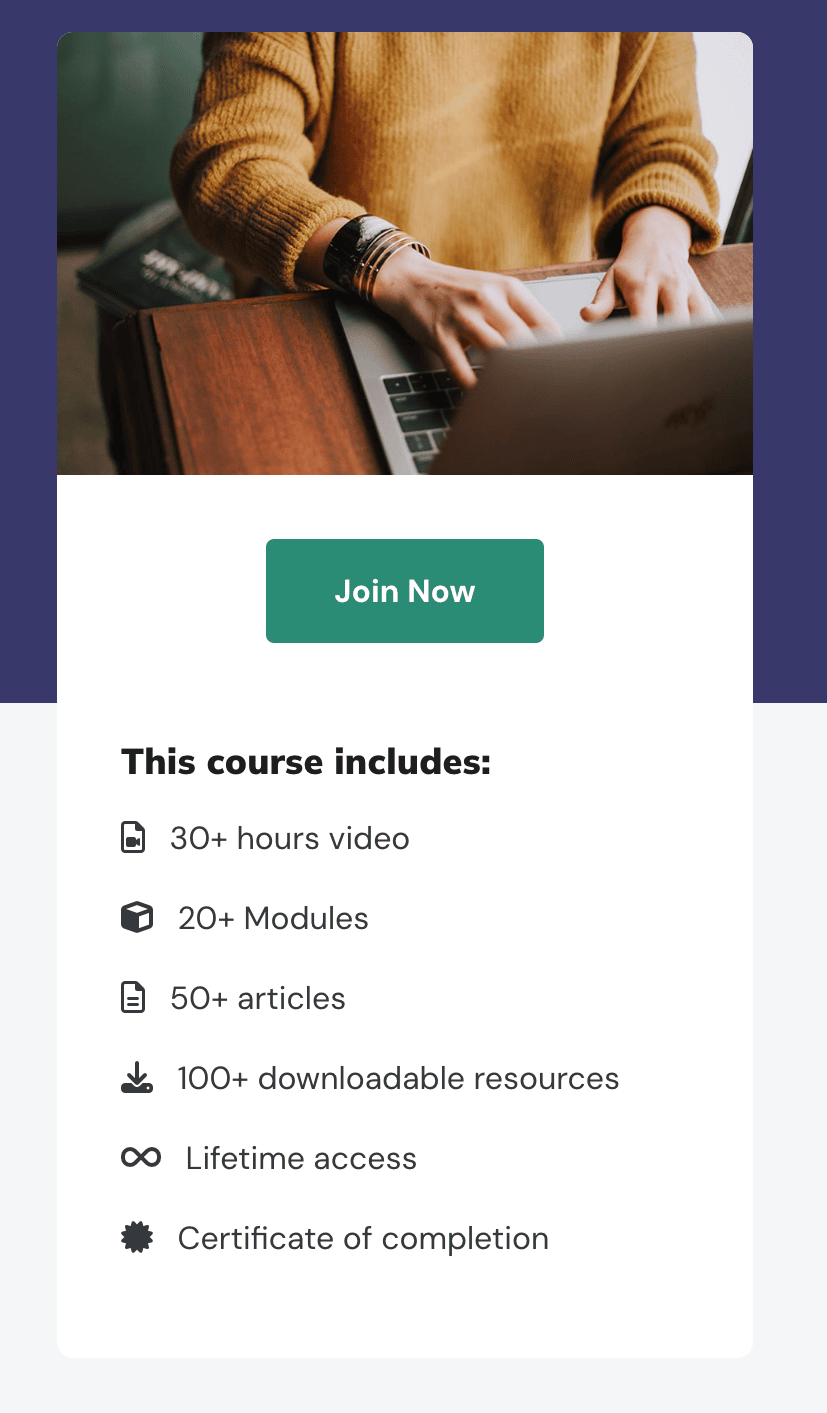
Course Hero Section
You can use this section to give your audience a quick introduction of your course.
Any image you want to use in the HTML file needs to be uploaded to your server first so you can have the image URL.

    <div class="course-hero-section section theme-dark-bg mb-5">
	    <div class="row">
		    <div class="col-12 col-lg-6">
			    <div class="course-badge badge badge-success mb-2">Popular Course</div>
			    <h1 class="section-title mb-3">Course Name Lorem Ipsum Dolor Sit Amet</h1>
			    <div class="course-summary mb-3">Are you ready to take your skills to the next level? Join our transformative course and embark on a journey of personal and professional growth like never before.</div>

			    <div class="cta-holder mb-4"><a class="btn theme-btn-secondary" href="#">Start Learning Now</a></div>
			    <div class="meta">
				    <ul class="meta-list list-unstyled list-inline">
					    <li class="list-inline-item mb-3"><span class="badge">Intermediate</span></li>
					    <li class="list-inline-item mb-3"><span class="badge">8+ Hours</span></li>
					    <li class="list-inline-item mb-3"><span class="badge">50+ Videos</span></li>
					    <li class="list-inline-item mb-3"><span class="badge">2000+ Learners</span></li>
				    </ul><!--//meta-list-->
			    </div><!--//meta-->
		    </div><!--//col-->

		    <div class="col-12 col-lg-6">
			    <img class="course-summary-image img-fluid rounded" src="https://3rdwavemedia.com/demo-images/courses/course-1.jpg" alt="image">
		    </div><!--//col-->
	    </div><!--//row-->
    </div><!--//course-hero-section-->
If you want to have a white background instead of the dark-colored background for this section, you just need to remove the
theme-dark-bg class from the section code.
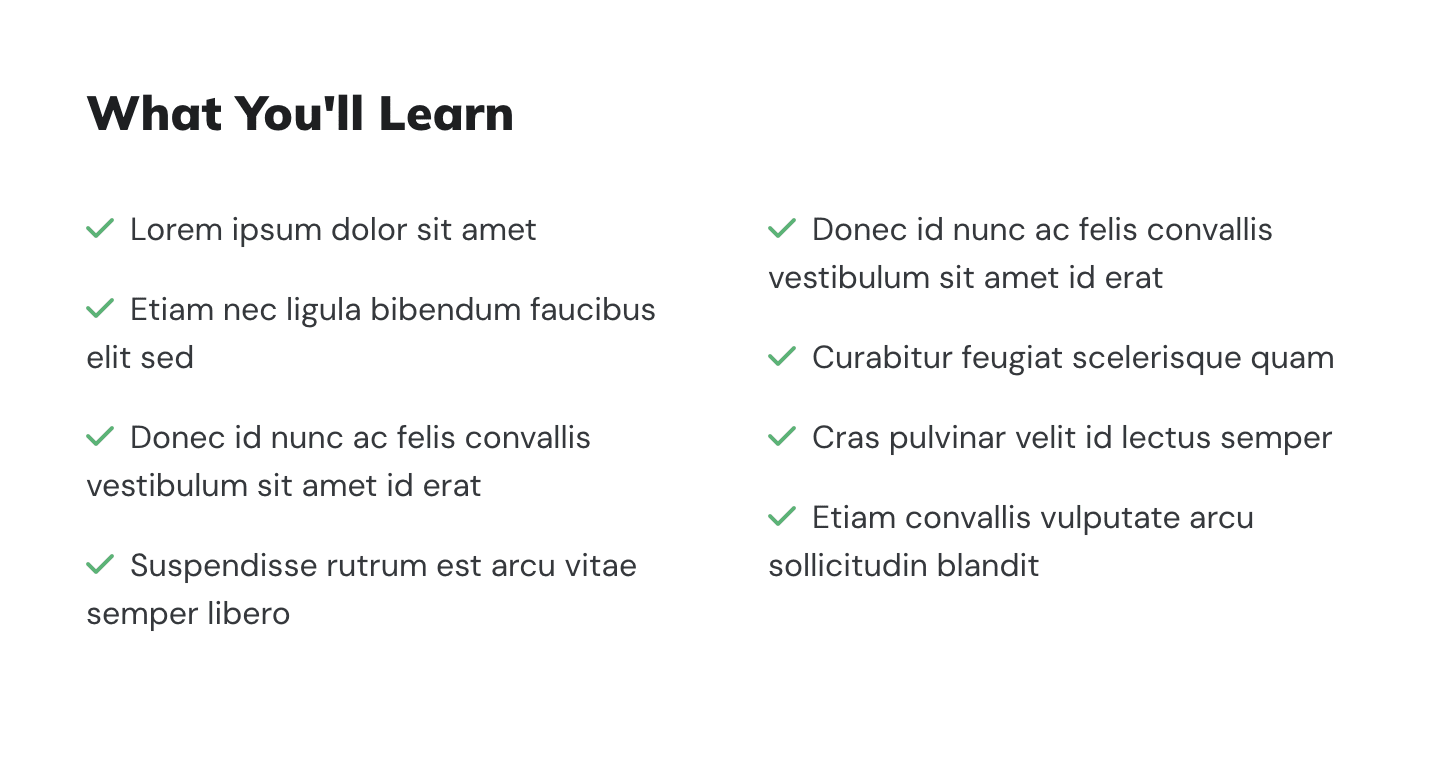
Course Overview Section
You can give your audience an overview of what one can expect to learn in your course. If you have a course promo video on a platform such as Youtube you can embed the video in this section too.

    <div class="course-overview-section section bg-white mb-5">
	    <div class="container">
		    <h2 class="section-title text-center mb-4">What You'll Learn</h2>
		    <div class="text-center pt-2">
				<ul class="theme-column-list list-unstyled mx-auto d-inline-block">
				    <li><i class="icon fa fa-check mr-2"></i>Lorem ipsum dolor sit amet</li>
				    <li><i class="icon fa fa-check mr-2"></i>Etiam nec ligula bibendum faucibus elit sed</li>
				    <li><i class="icon fa fa-check mr-2"></i>Donec id nunc ac felis convallis vestibulum sit amet id erat</li>
				    <li><i class="icon fa fa-check mr-2"></i>Suspendisse rutrum est arcu vitae semper libero</li>
				    <li><i class="icon fa fa-check mr-2"></i>Donec id nunc ac felis convallis vestibulum sit amet id erat</li>
				    <li><i class="icon fa fa-check mr-2"></i>Curabitur feugiat scelerisque quam</li>
				    <li><i class="icon fa fa-check mr-2"></i>Cras pulvinar velit id lectus semper</li>
				    <li><i class="icon fa fa-check mr-2"></i>Etiam convallis vulputate arcu sollicitudin blandit</li>
				</ul>
            </div><!--//text-center-->

            <div class="cta-holder mb-4 text-center"><a class="btn btn-primary theme-btn-cta theme-btn-primary" href="#">Join Now</a></div>

            <div class="course-video-container text-center mx-auto my-5">
			    <div class="embed-responsive embed-responsive-16by9">
				   <iframe class="embed-responsive-item"  width="560" height="315" src="https://www.youtube.com/embed/XH3QQAV-04g" title="YouTube video player" frameborder="0" allow="accelerometer; autoplay; clipboard-write; encrypted-media; gyroscope; picture-in-picture; web-share" allowfullscreen></iframe>
				</div>
			</div><!--//video-container-->
	    </div><!--//container-->
    </div><!--//course-overview-section-->
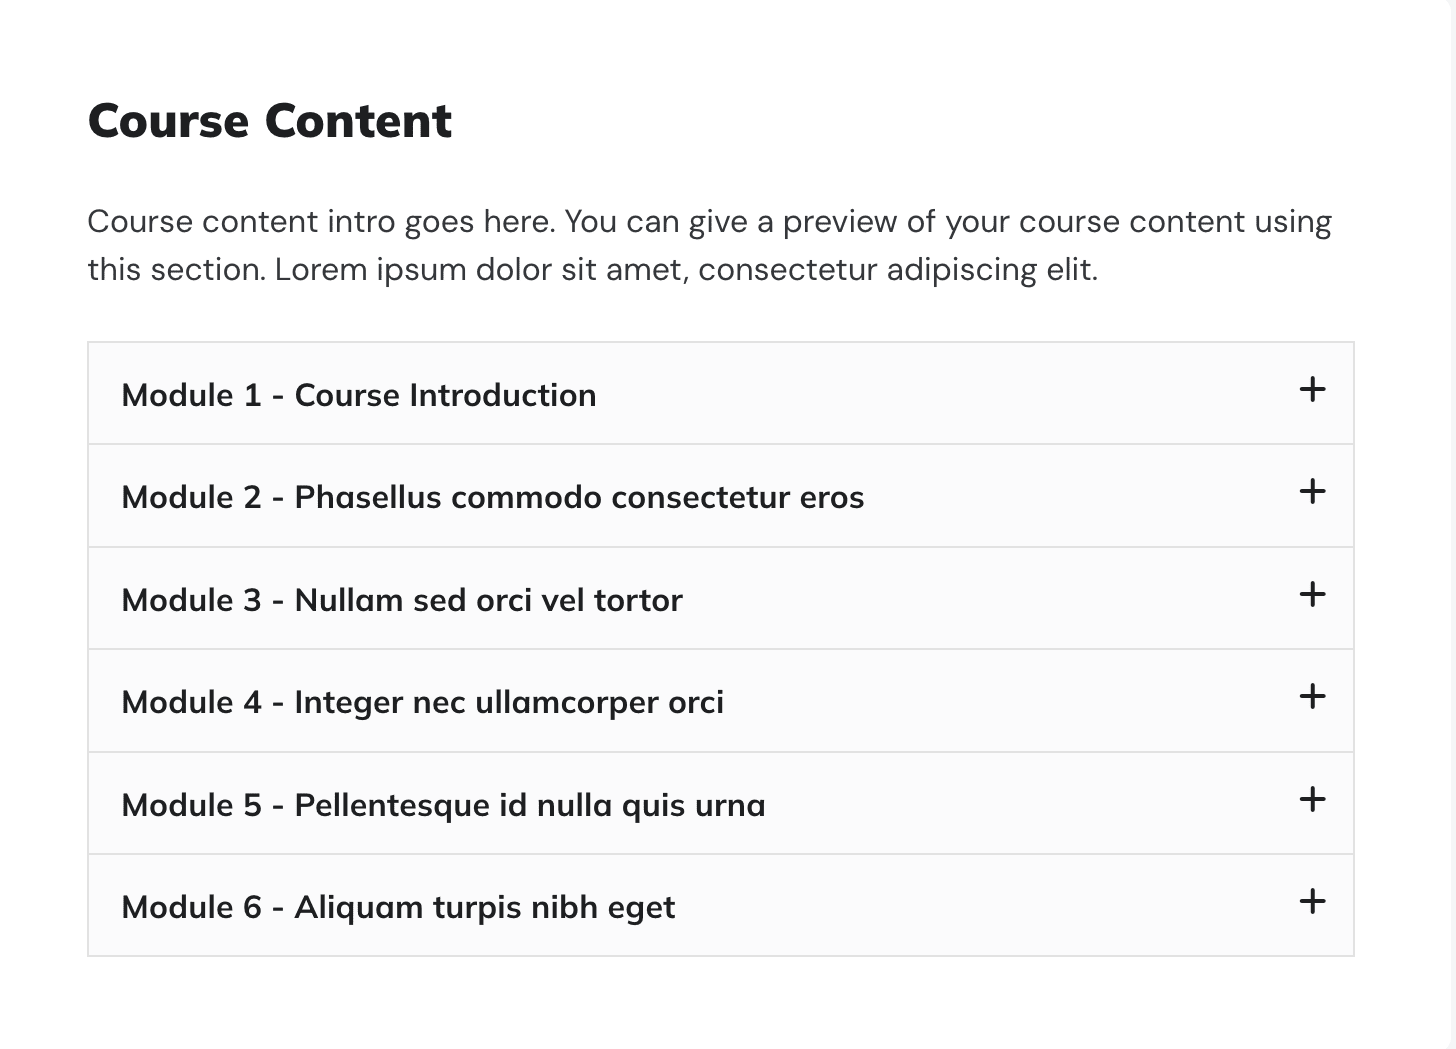
Course Content Section
This section is great to give an overview of your course content structure.
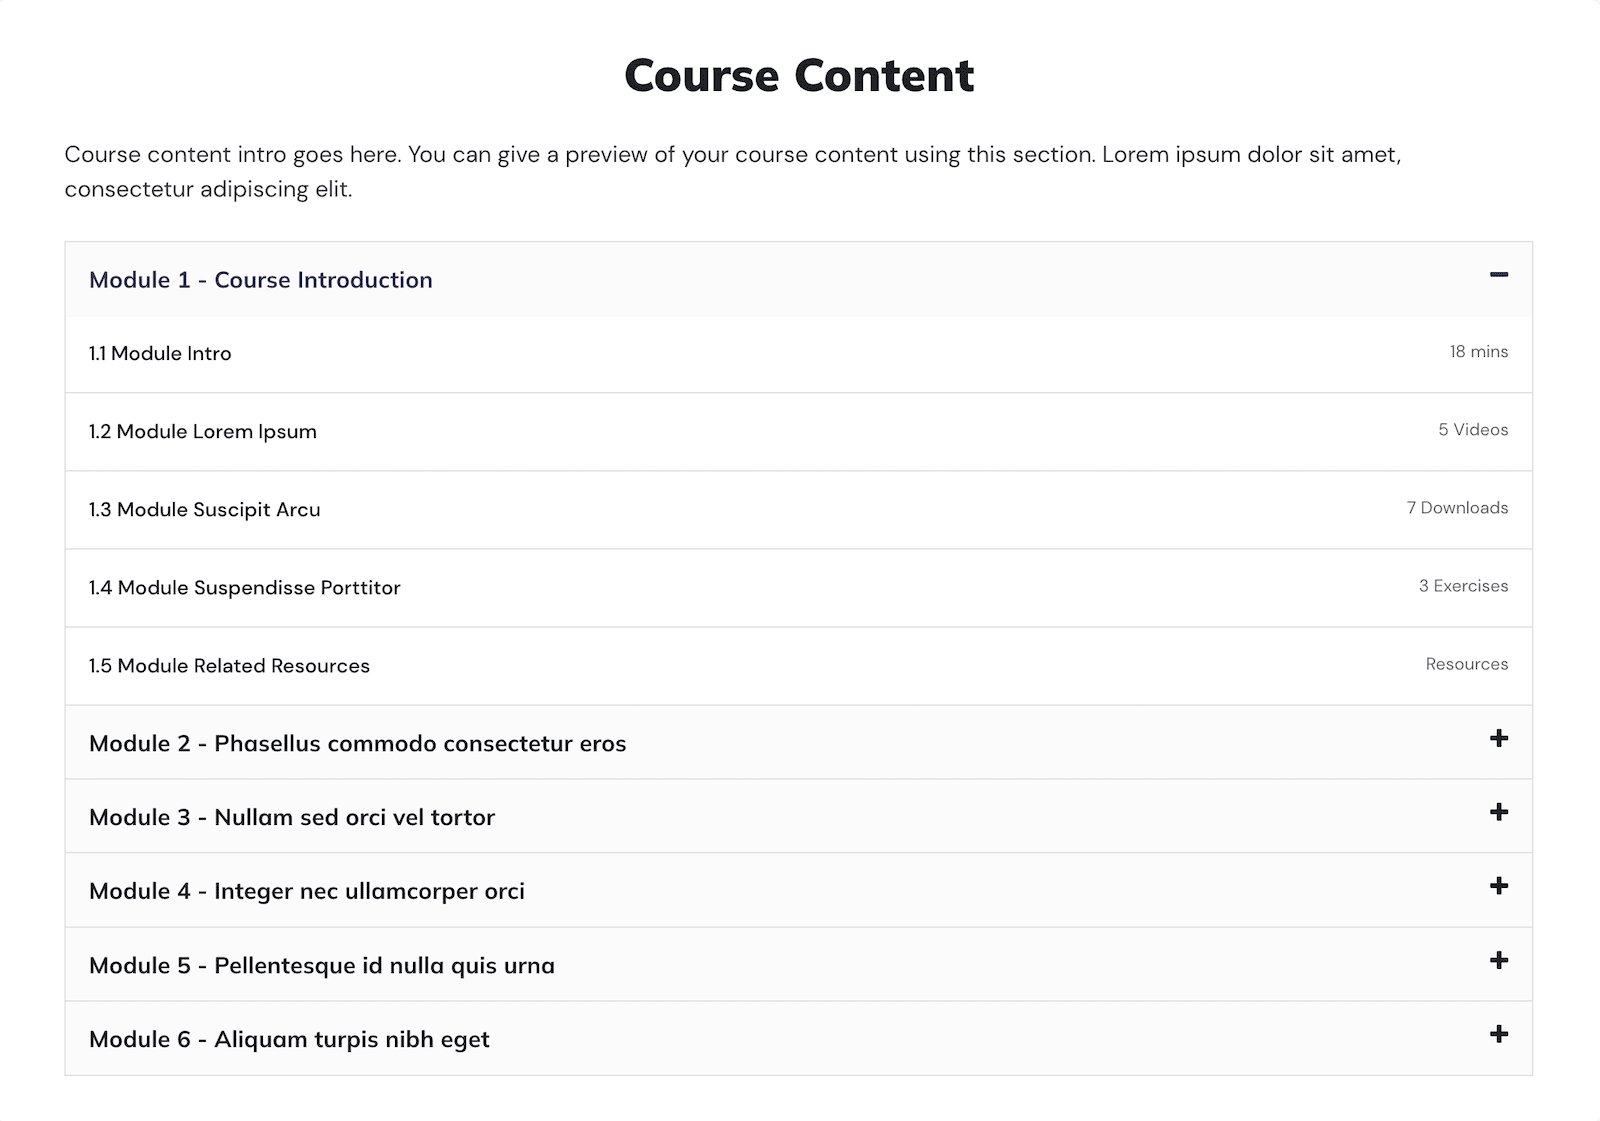
    <div class="course-content-section section bg-white mb-5">
	    <div class="container">
		    <h2 class="section-title text-center mb-4">Course Content</h2>
		    <div class="section-intro mb-4">Course content intro goes here. You can give a preview of your course content using this section. Lorem ipsum dolor sit amet, consectetur adipiscing elit. </div>
		    <div class="accordion-wrapper">
		        <div class="accordion module-accordion" id="module-accordion">
				<div class="module-item card">
				    <div class="module-header card-header" id="module-heading-1">
				        <h4 class="module-title mb-0">
					        <a class="card-toggle module-toggle" href="#module-1" data-toggle="collapse" data-target="#module-1" aria-expanded="false" aria-controls="module-1">
						        <i class="icon fa fa-plus"></i>
						        <i class="icon fa fa-minus"></i>
					            Module 1 - Course Introduction
					        </a>
				        </h4>
				    </div><!--//card-header-->

					<div id="module-1" class="module-content collapse" aria-labelledby="module-heading-1" >
						<div class="card-body p-0">
						    <div class="module-sub-item p-3">
							    <div class="row justify-content-between">
								    <div class="col-9">1.1 Module Intro</div>
								    <div class="col-3 text-right extra-info">18 mins</div>
							    </div>
						    </div><!--//module-sub-item-->
						    <div class="module-sub-item p-3">
							    <div class="row justify-content-between">
								    <div class="col-9">1.2 Module Lorem Ipsum</div>
								    <div class="col-3 text-right extra-info">5 Videos</div>
							    </div>
						    </div><!--//module-sub-item-->
						    <div class="module-sub-item p-3">
							    <div class="row justify-content-between">
								    <div class="col-9">1.3 Module Suscipit Arcu</div>
								    <div class="col-3 text-right extra-info">7 Downloads</div>
							    </div>
						    </div><!--//module-sub-item-->
						    <div class="module-sub-item p-3">
							    <div class="row justify-content-between">
								    <div class="col-9">1.4 Module Suspendisse Porttitor</div>
								    <div class="col-3 text-right extra-info">3 Exercises</div>
							    </div>
						    </div><!--//module-sub-item-->
						    <div class="module-sub-item p-3">
							    <div class="row justify-content-between">
								    <div class="col-9">1.5 Module Related Resources</div>
								    <div class="col-3 text-right extra-info">Resources</div>
							    </div>
						    </div><!--//module-sub-item-->
						</div><!--//card-body-->
					</div><!--//module-content-->
				</div><!--//module-item-->

				<div class="module-item card">
				    <div class="module-header card-header" id="module-heading-2">
				        <h4 class="module-title mb-0">
					        <a class="card-toggle module-toggle" href="#module-2" data-toggle="collapse" data-target="#module-2" aria-expanded="false" aria-controls="module-2">
						       <i class="icon fa fa-plus"></i>
						        <i class="icon fa fa-minus"></i>
					            Module 2 - Phasellus commodo consectetur eros
					        </a>
				        </h4>
				    </div><!--//card-header-->

					<div id="module-2" class="module-content collapse" aria-labelledby="module-heading-2" >
						<div class="card-body p-0">
						    <div class="module-sub-item p-3">
							    <div class="row justify-content-between">
								    <div class="col-9">2.1 Module Intro Video</div>
								    <div class="col-3 text-right extra-info">Extra info</div>
							    </div>
						    </div><!--//module-sub-item-->
						    <div class="module-sub-item p-3">
							    <div class="row justify-content-between">
								    <div class="col-9">2.2 Module Lorem Ipsum</div>
								    <div class="col-3 text-right extra-info">Extra info</div>
							    </div>
						    </div><!--//module-sub-item-->
						    <div class="module-sub-item p-3">
							    <div class="row justify-content-between">
								    <div class="col-9">2.3 Module Suscipit Arcu</div>
								    <div class="col-3 text-right extra-info">Extra info</div>
							    </div>
						    </div><!--//module-sub-item-->
						</div><!--//card-body-->
					</div><!--//module-content-->
				</div><!--//module-item-->

				<div class="module-item card">
				    <div class="module-header card-header" id="module-heading-3">
				        <h4 class="module-title mb-0">
					        <a class="card-toggle module-toggle" href="#module-3" data-toggle="collapse" data-target="#module-3" aria-expanded="false" aria-controls="module-3">
						        <i class="icon fa fa-plus"></i>
						        <i class="icon fa fa-minus"></i>
					            Module 3 - Nullam sed orci vel tortor
					        </a>
				        </h4>
				    </div><!--//card-header-->

					<div id="module-3" class="module-content collapse" aria-labelledby="module-heading-3" >
						<div class="card-body p-0">
						    <div class="module-sub-item p-3">
							    <div class="row justify-content-between">
								    <div class="col-9">3.1 Module Intro Video</div>
								    <div class="col-3 text-right extra-info">Extra info</div>
							    </div>
						    </div><!--//module-sub-item-->
						    <div class="module-sub-item p-3">
							    <div class="row justify-content-between">
								    <div class="col-9">3.2 Module Lorem Ipsum</div>
								    <div class="col-3 text-right extra-info">Extra info</div>
							    </div>
						    </div><!--//module-sub-item-->
						    <div class="module-sub-item p-3">
							    <div class="row justify-content-between">
								    <div class="col-9">3.3 Module Suscipit Arcu</div>
								    <div class="col-3 text-right extra-info">Extra info</div>
							    </div>
						    </div><!--//module-sub-item-->
						</div><!--//card-body-->
					</div><!--//module-content-->
				</div><!--//module-item-->

				<div class="module-item card">
				    <div class="module-header card-header" id="module-heading-4">
				        <h4 class="module-title mb-0">
					        <a class="card-toggle module-toggle" href="#module-4" data-toggle="collapse" data-target="#module-4" aria-expanded="false" aria-controls="module-4">
						        <i class="icon fa fa-plus"></i>
						        <i class="icon fa fa-minus"></i>
					            Module 4 - Integer nec ullamcorper orci
					        </a>
				        </h4>
				    </div><!--//card-header-->

					<div id="module-4" class="module-content collapse" aria-labelledby="module-heading-4" >
						<div class="card-body p-0">
						    <div class="module-sub-item p-3">
							    <div class="row justify-content-between">
								    <div class="col-9">4.1 Module Intro Video</div>
								    <div class="col-3 text-right extra-info">Extra info</div>
							    </div>
						    </div><!--//module-sub-item-->
						    <div class="module-sub-item p-3">
							    <div class="row justify-content-between">
								    <div class="col-9">4.2 Module Lorem Ipsum</div>
								    <div class="col-3 text-right extra-info">Extra info</div>
							    </div>
						    </div><!--//module-sub-item-->
						    <div class="module-sub-item p-3">
							    <div class="row justify-content-between">
								    <div class="col-9">4.3 Module Suscipit Arcu</div>
								    <div class="col-3 text-right extra-info">Extra info</div>
							    </div>
						    </div><!--//module-sub-item-->
						</div><!--//card-body-->
					</div><!--//module-content-->
				</div><!--//module-item-->

				<div class="module-item card">
				    <div class="module-header card-header" id="module-heading-5">
				        <h4 class="module-title mb-0">
					        <a class="card-toggle module-toggle" href="#module-5" data-toggle="collapse" data-target="#module-5" aria-expanded="false" aria-controls="module-5">
						        <i class="icon fa fa-plus"></i>
						        <i class="icon fa fa-minus"></i>
					            Module 5 - Pellentesque id nulla quis urna
					        </a>
				        </h4>
				    </div><!--//card-header-->

					<div id="module-5" class="module-content collapse" aria-labelledby="module-heading-5" >
						<div class="card-body p-0">
						    <div class="module-sub-item p-3">
							    <div class="row justify-content-between">
								    <div class="col-9">5.1 Module Intro Video</div>
								    <div class="col-3 text-right extra-info">Extra info</div>
							    </div>
						    </div><!--//module-sub-item-->
						    <div class="module-sub-item p-3">
							    <div class="row justify-content-between">
							    <div class="col-9">5.2 Module Lorem Ipsum</div>
								    <div class="col-3 text-right extra-info">Extra info</div>
							    </div>
						    </div><!--//module-sub-item-->
						    <div class="module-sub-item p-3">
							    <div class="row justify-content-between">
								    <div class="col-9">5.3 Module Suscipit Arcu</div>
								    <div class="col-3 text-right extra-info">Extra info</div>
							    </div>
						    </div><!--//module-sub-item-->
						</div><!--//card-body-->
					</div><!--//module-content-->
				</div><!--//module-item-->

				<div class="module-item card">
				    <div class="module-header card-header" id="module-heading-6">
				        <h4 class="module-title mb-0">
					        <a class="card-toggle module-toggle" href="#module-6" data-toggle="collapse" data-target="#module-6" aria-expanded="false" aria-controls="module-6">
						        <i class="icon fa fa-plus"></i>
						        <i class="icon fa fa-minus"></i>
					            Module 6 - Aliquam turpis nibh eget
					        </a>
				        </h4>
				    </div><!--//card-header-->

					<div id="module-6" class="module-content collapse" aria-labelledby="module-heading-6" >
						<div class="card-body p-0">
						    <div class="module-sub-item p-3">
							    <div class="row justify-content-between">
								    <div class="col-9">6.1 Module Intro Video</div>
								    <div class="col-3 text-right extra-info">Extra info</div>
							    </div>
						    </div><!--//module-sub-item-->
						    <div class="module-sub-item p-3">
							    <div class="row justify-content-between">
							    <div class="col-9">6.2 Module Lorem Ipsum</div>
								    <div class="col-3 text-right extra-info">Extra info</div>
							    </div>
						    </div><!--//module-sub-item-->
						    <div class="module-sub-item p-3">
							    <div class="row justify-content-between">
								    <div class="col-9">6.3 Module Suscipit Arcu</div>
								    <div class="col-3 text-right extra-info">Extra info</div>
							    </div>
						    </div><!--//module-sub-item-->
						</div><!--//card-body-->
					</div><!--//module-content-->
				</div><!--//module-item-->
			</div><!--//module-accordion-->
		    </div><!--//accordion-wrapper-->
	    </div><!--//container-->
    </div><!--//course-content-->
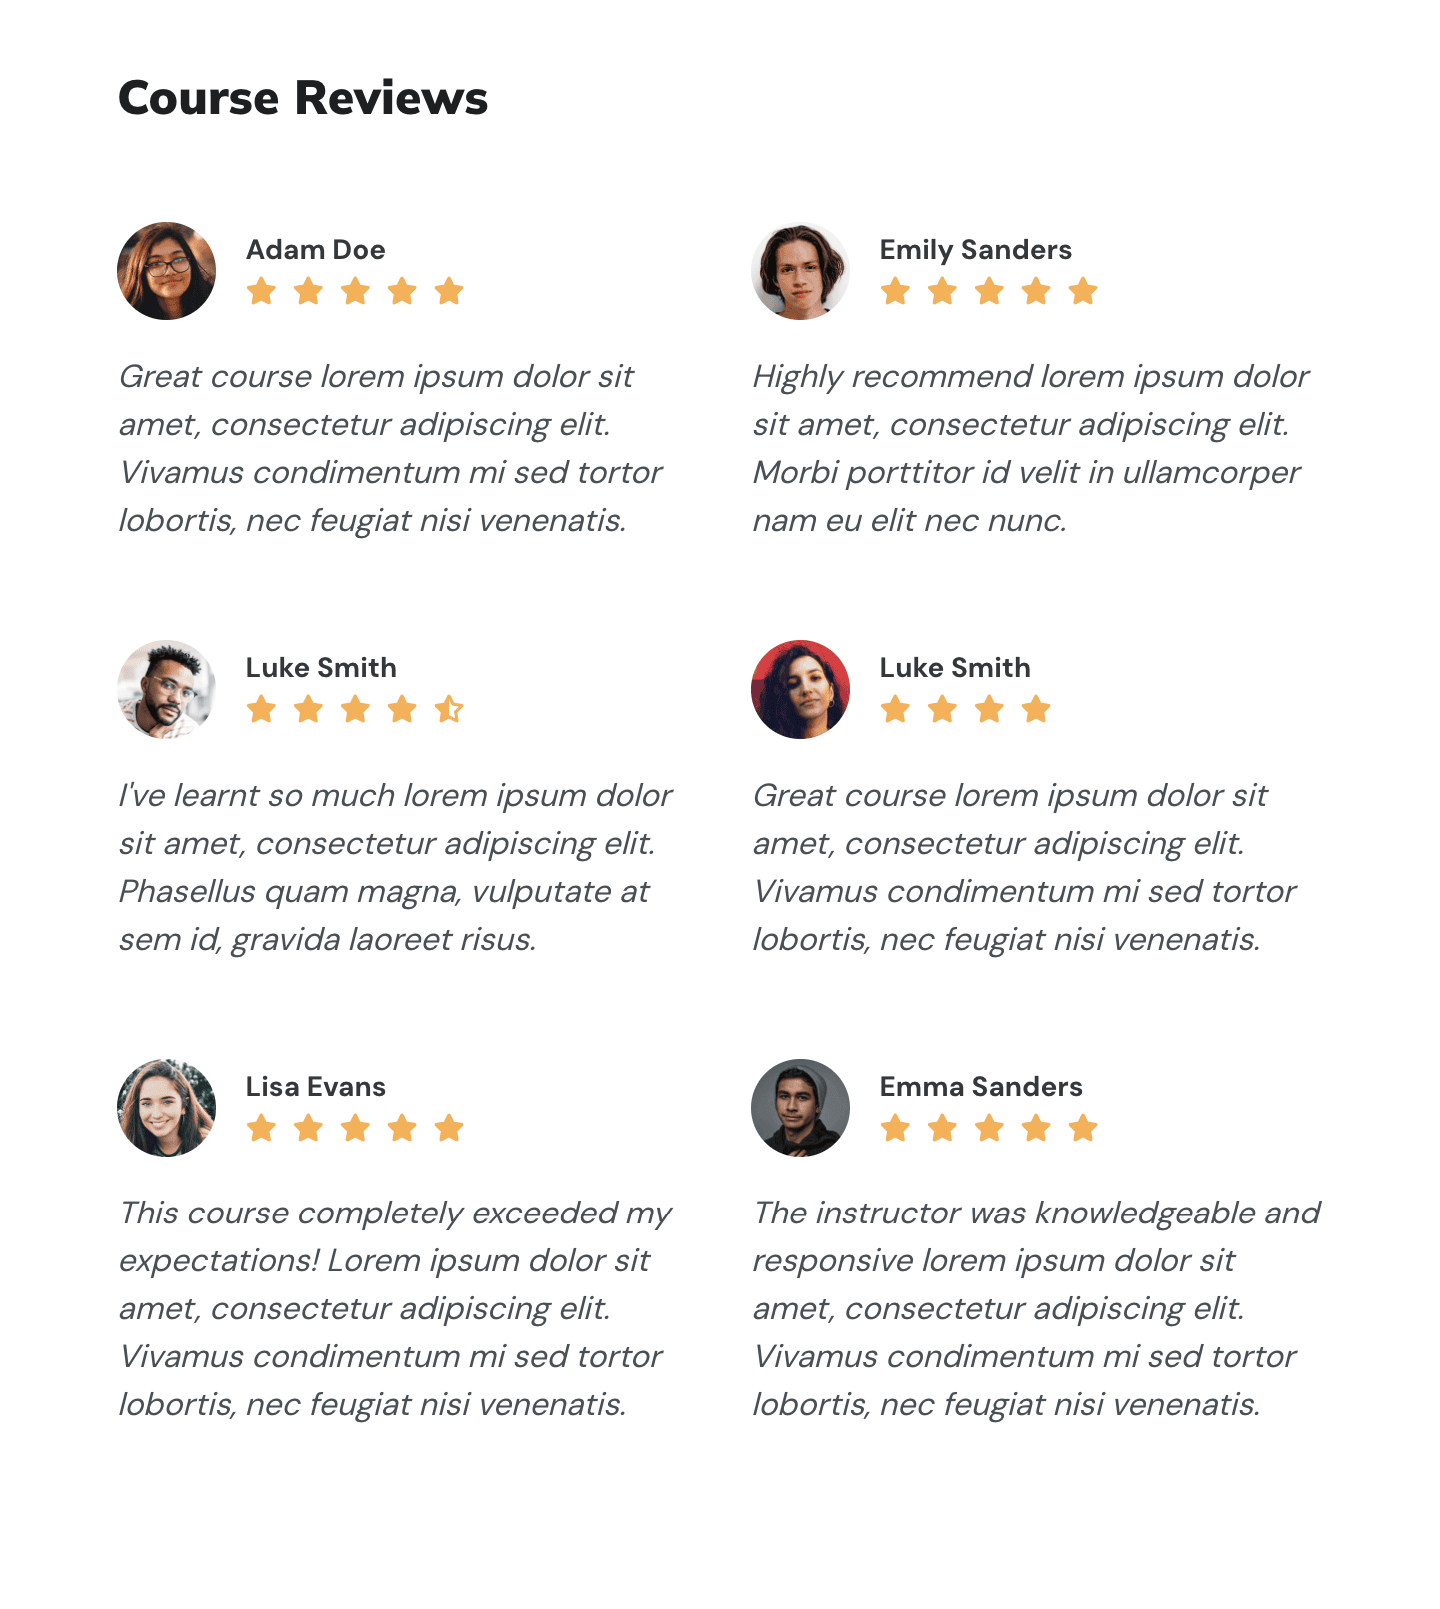
Course Reviews Section
You can showcase positive course reviews to provide social proof to prospective learners.
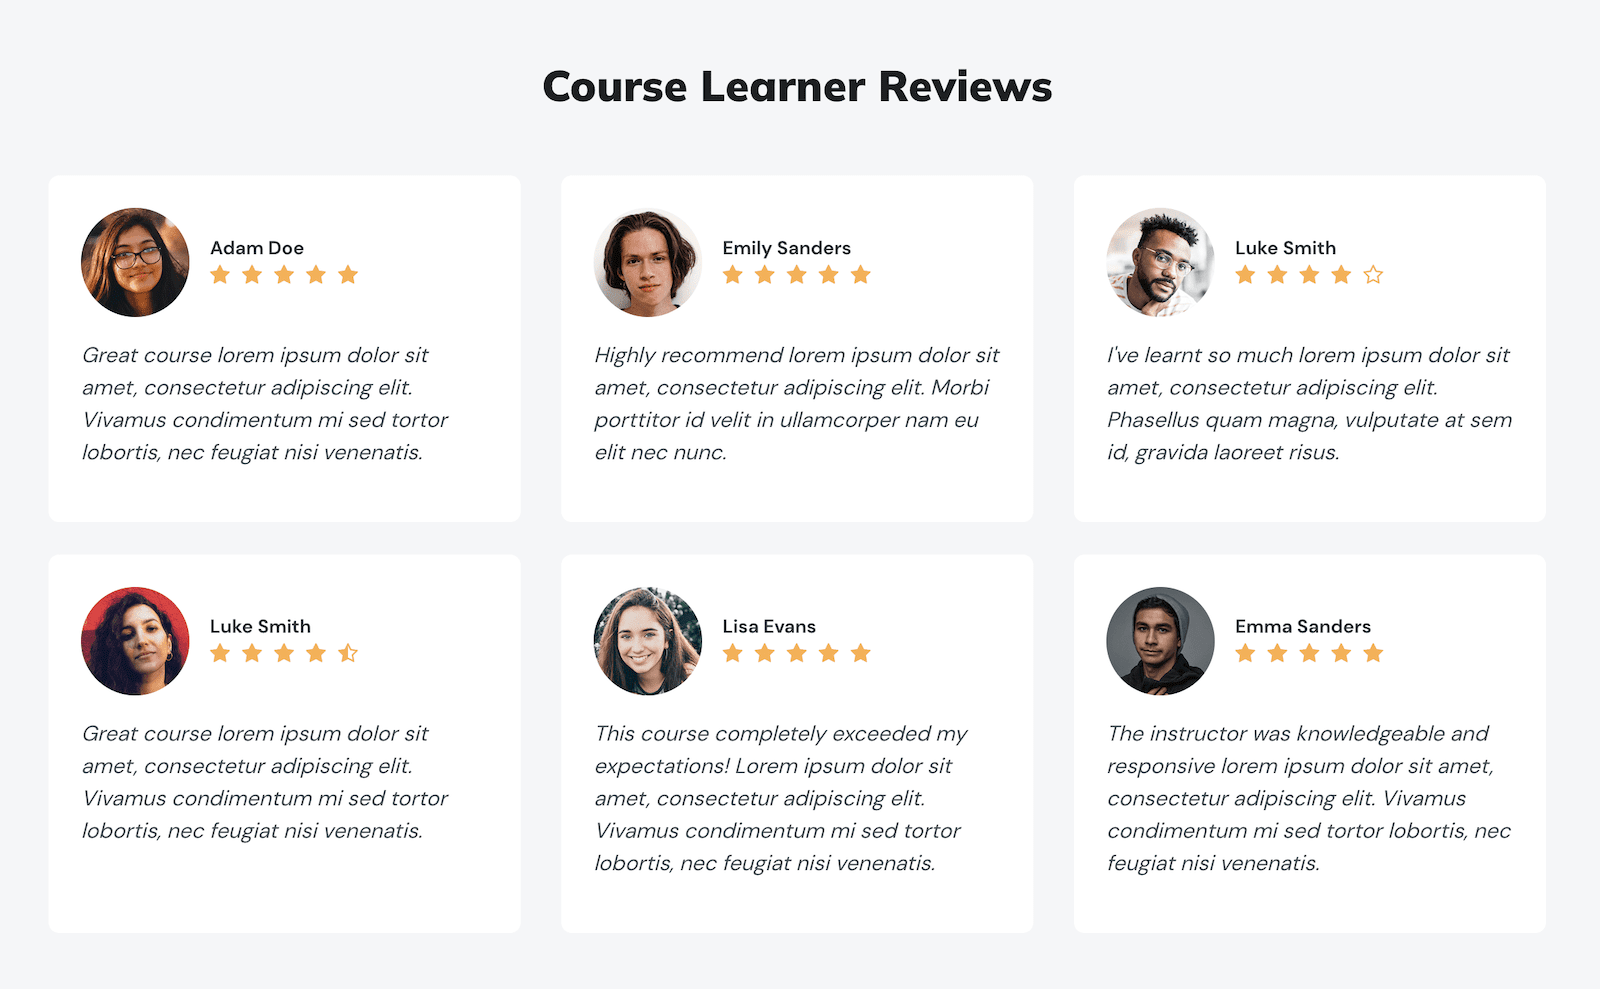
<div class="course-reviews-section section">
        <div class="container p-0">
	        <h3 class="section-title mb-5 text-center">Course Learner Reviews</h3>

	        <div class="row justify-content-center">
		        <div class="col-12 col-md-6 col-lg-4 mb-4">
			        <div class="review-item bg-white p-4">

						<div class="source mb-3">
							<div class="row align-items-center">
								<div class="col-3 col-lg-4">
									<div class="profile"><img class="profile-image img-fluid" src="https://3rdwavemedia.com/demo-images/users/user-1.png" alt=""></div>
								</div><!--col-->

								<div class="col-9 col-lg-8 pl-0">
									<div class="name">Adam Doe</div>
									<div class="rating">
										<i class="icon fa fa-star"></i>
										<i class="icon fa fa-star"></i>
										<i class="icon fa fa-star"></i>
										<i class="icon fa fa-star"></i>
										<i class="icon fa fa-star"></i>
									</div>
								</div><!--//col-->
							</div><!--//row-->
						</div><!--//source-->
						<blockquote class="quote">
							<p>Great course lorem ipsum dolor sit amet, consectetur adipiscing elit. Vivamus condimentum mi sed tortor lobortis, nec feugiat nisi venenatis.</p>
						</blockquote><!--//quote-->
					</div><!--//item-->
		        </div><!--//col-->

		        <div class="col-12 col-md-6 col-lg-4 mb-4">
			        <div class="review-item bg-white p-4">
						<div class="source mb-3">
							<div class="row align-items-center">
								<div class="col-3 col-lg-4">
									<div class="profile"><img class="profile-image img-fluid" src="https://3rdwavemedia.com/demo-images/users/user-2.png" alt=""></div>
								</div><!--col-->
								<div class="col-9 col-lg-8 pl-0">
									<div class="name">Emily Sanders</div>
									<div class="rating">
										<i class="icon fa fa-star"></i>
										<i class="icon fa fa-star"></i>
										<i class="icon fa fa-star"></i>
										<i class="icon fa fa-star"></i>
										<i class="icon fa fa-star"></i>
									</div>
								</div><!--//col-->
							</div><!--//row-->
						</div><!--//source-->
						<blockquote class="quote">
							<p>Highly recommend lorem ipsum dolor sit amet, consectetur adipiscing elit. Morbi porttitor id velit in ullamcorper nam eu elit nec nunc. </p>
						</blockquote><!--//quote-->
					</div><!--//item-->
		        </div><!--//col-->

		        <div class="col-12 col-md-6 col-lg-4 mb-4">
			        <div class="review-item bg-white p-4">

						<div class="source mb-3">
							<div class="row align-items-center">
								<div class="col-3 col-lg-4">
									<div class="profile"><img class="profile-image img-fluid" src="https://3rdwavemedia.com/demo-images/users/user-3.png" alt=""></div>
								</div><!--col-->

								<div class="col-9 col-lg-8 pl-0">
									<div class="name">Luke Smith</div>
									<div class="rating">
										<i class="icon fa fa-star"></i>
										<i class="icon fa fa-star"></i>
										<i class="icon fa fa-star"></i>
										<i class="icon fa fa-star"></i>
										<i class="icon fa fa-star-o"></i>
									</div>
								</div><!--//col-->
							</div><!--//row-->
						</div><!--//source-->
						<blockquote class="quote">
							<p>I've learnt so much lorem ipsum dolor sit amet, consectetur adipiscing elit. Phasellus quam magna, vulputate at sem id, gravida laoreet risus.</p>
						</blockquote><!--//quote-->
					</div><!--//item-->
		        </div><!--//col-->

		        <div class="col-12 col-md-6 col-lg-4 mb-4">
			        <div class="review-item bg-white p-4">

						<div class="source mb-3">
							<div class="row align-items-center">
								<div class="col-3 col-lg-4">
									<div class="profile"><img class="profile-image img-fluid" src="https://3rdwavemedia.com/demo-images/users/user-4.png" alt=""></div>
								</div><!--col-->

								<div class="col-9 col-lg-8 pl-0">
									<div class="name">Luke Smith</div>
									<div class="rating">
										<i class="icon fa fa-star"></i>
										<i class="icon fa fa-star"></i>
										<i class="icon fa fa-star"></i>
										<i class="icon fa fa-star"></i>
										<i class="icon fa fa-star-half-o"></i>
									</div>
								</div><!--//col-->
							</div><!--//row-->
						</div><!--//source-->
						<blockquote class="quote">
							<p>Great course lorem ipsum dolor sit amet, consectetur adipiscing elit. Vivamus condimentum mi sed tortor lobortis, nec feugiat nisi venenatis.</p>
						</blockquote><!--//quote-->
					</div><!--//item-->
		        </div><!--//col-->

		        <div class="col-12 col-md-6 col-lg-4 mb-4">
			        <div class="review-item bg-white p-4">

						<div class="source mb-3">
							<div class="row align-items-center">
								<div class="col-3 col-lg-4">
									<div class="profile"><img class="profile-image img-fluid" src="https://3rdwavemedia.com/demo-images/users/user-5.png" alt=""></div>
								</div><!--col-->

								<div class="col-9 col-lg-8 pl-0">
									<div class="name">Lisa Evans</div>
									<div class="rating">
										<i class="icon fa fa-star"></i>
										<i class="icon fa fa-star"></i>
										<i class="icon fa fa-star"></i>
										<i class="icon fa fa-star"></i>
										<i class="icon fa fa-star"></i>
									</div>
								</div><!--//col-->
							</div><!--//row-->
						</div><!--//source-->
						<blockquote class="quote">
							<p>This course completely exceeded my expectations! Lorem ipsum dolor sit amet, consectetur adipiscing elit. Vivamus condimentum mi sed tortor lobortis, nec feugiat nisi venenatis.</p>
						</blockquote><!--//quote-->
					</div><!--//item-->
		        </div><!--//col-->

		        <div class="col-12 col-md-6 col-lg-4 mb-4">
			        <div class="review-item bg-white p-4">
						<div class="source mb-3">
							<div class="row align-items-center">
								<div class="col-3 col-lg-4">
									<div class="profile"><img class="profile-image img-fluid" src="https://3rdwavemedia.com/demo-images/users/user-6.png" alt=""></div>
								</div><!--col-->

								<div class="col-9 col-lg-8 pl-0">
									<div class="name">Emma Sanders</div>
									<div class="rating">
										<i class="icon fa fa-star"></i>
										<i class="icon fa fa-star"></i>
										<i class="icon fa fa-star"></i>
										<i class="icon fa fa-star"></i>
										<i class="icon fa fa-star"></i>
									</div>
								</div><!--//col-->
							</div><!--//row-->
						</div><!--//source-->
						<blockquote class="quote">
							<p>The instructor was knowledgeable and responsive lorem ipsum dolor sit amet, consectetur adipiscing elit. Vivamus condimentum mi sed tortor lobortis, nec feugiat nisi venenatis.</p>
						</blockquote><!--//quote-->
					</div><!--//item-->
		        </div><!--//col-->
	        </div><!--//row-->
        </div><!--//container-->
    </div><!--//course-reviews-section-->
Course Pricing Section
If learners need to pay for the course before joining you can use this section to list your pricing structure.
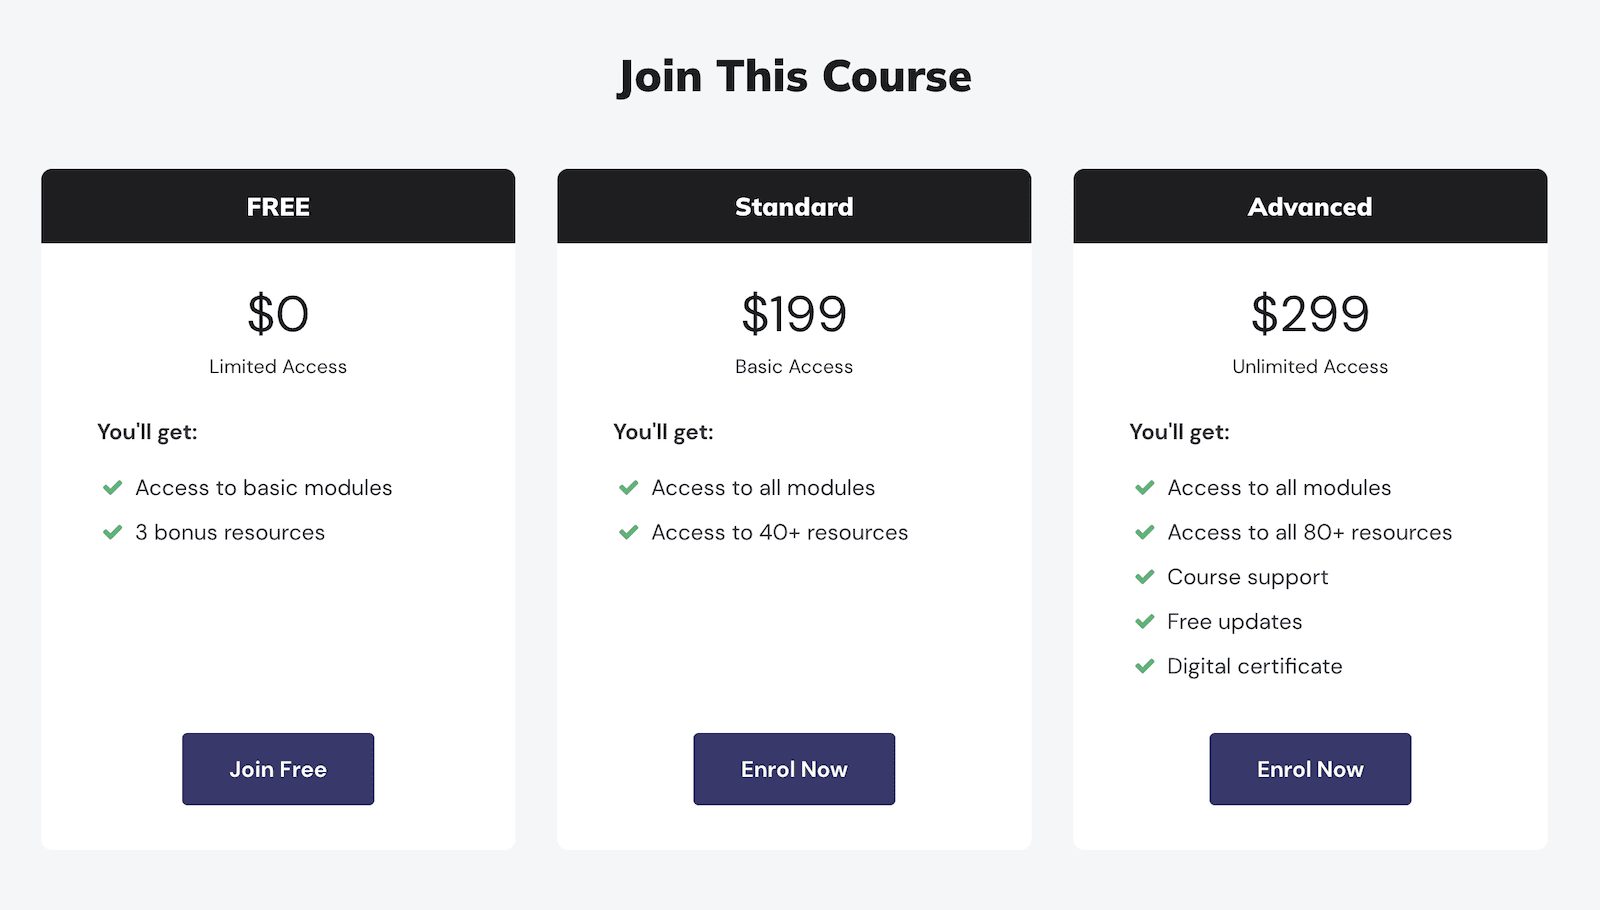
    <div class="course-pricing-section section py-5">
        <div class="container">
	        <h3 class="section-title text-center mb-5">Join This Course</h3>
            <div class="pricing-plan">
	            <div class="row justify-content-center">
		            <div class="col-lg-4 col-12  mb-4">
			            <div class="plan-item">
				            <div class="plan-header">
					            <h4 class="plan-heading p-3 theme-bg-primary text-center">FREE</h4>
				            </div><!--//plan-header-->

				            <div class="plan-details p-4">
					            <div class="plan-desc text-center mb-4">
						            <div class="plan-price">$0</div>
						            <div class="plan-price-desc">Limited Access</div>
					            </div>
					            <div class="plan-content px-3">
					                <div class="plan-content-intro">You'll get:</div>
						            <ul class="plan-content-list list-unstyled">
							            <li><i class="icon fa fa-check"></i>Access to basic modules</li>
							            <li><i class="icon fa fa-check"></i>3 bonus resources</li>
						            </ul>
					            </div><!--//plan-content-->
				            </div><!--//plan-content-->
				            <div class="plan-cta text-center px-4">
					            <a class="btn btn-primary theme-btn-primary" href="#" target="_blank">Join Free</a>
					        </div>
			            </div><!--//plan-item-->
		            </div><!--//col-->
		            <div class="col-lg-4 col-12  mb-4">
			            <div class="plan-item">
				            <div class="plan-header">
					            <h4 class="plan-heading p-3 text-center theme-bg-primary">Standard</h4>
				            </div><!--//plan-header-->

				            <div class="plan-details p-4">
					            <div class="plan-desc text-center mb-4">
						            <div class="plan-price">$199</div>
						            <div class="plan-price-desc">Basic Access</div>
					            </div>
					            <div class="plan-content px-3">
					                <div class="plan-content-intro">You'll get:</div>
						            <ul class="plan-content-list list-unstyled">
							            <li><i class="icon fa fa-check"></i>Access to all modules</li>
							            <li><i class="icon fa fa-check"></i>Access to 40+ resources</li>
						            </ul>
					            </div><!--//plan-content-->
				            </div><!--//plan-content-->
				            <div class="plan-cta text-center px-4">
					            <a class="btn btn-primary theme-btn-primary" href="#" target="_blank">Enrol Now</a>
					        </div>
			            </div><!--//plan-item-->
		            </div><!--//col-->
		            <div class="col-lg-4 col-12 mb-4">
			            <div class="plan-item">
				            <div class="plan-header">
					            <h4 class="plan-heading p-3 text-center theme-bg-primary">Advanced</h4>
				            </div><!--//plan-header-->
				            <div class="plan-details p-4">
					            <div class="plan-desc text-center mb-4">
						            <div class="plan-price">$299</div>
						            <div class="plan-price-desc">Unlimited Access</div>
					            </div>
					            <div class="plan-content px-3">
					                <div class="plan-content-intro">You'll get:</div>
						            <ul class="plan-content-list list-unstyled">
							            <li><i class="icon fa fa-check"></i>Access to all modules</li>
							            <li><i class="icon fa fa-check"></i>Access to all 80+ resources</li>
							            <li><i class="icon fa fa-check"></i>Course support</li>
							            <li><i class="icon fa fa-check"></i>Free updates</li>
							            <li><i class="icon fa fa-check"></i>Digital certificate</li>
						            </ul>
					            </div><!--//plan-content-->
				            </div><!--//plan-content-->
				            <div class="plan-cta text-center px-4">
					             <a class="btn btn-primary theme-btn-primary" href="#" target="_blank">Enrol Now</a>
					        </div>
			            </div><!--//plan-item-->
		            </div><!--//col-->
	            </div><!--//row-->
            </div><!--//pricing-plan-->
        </div><!--//container-->
    </div><!--//course-pricing-section-->
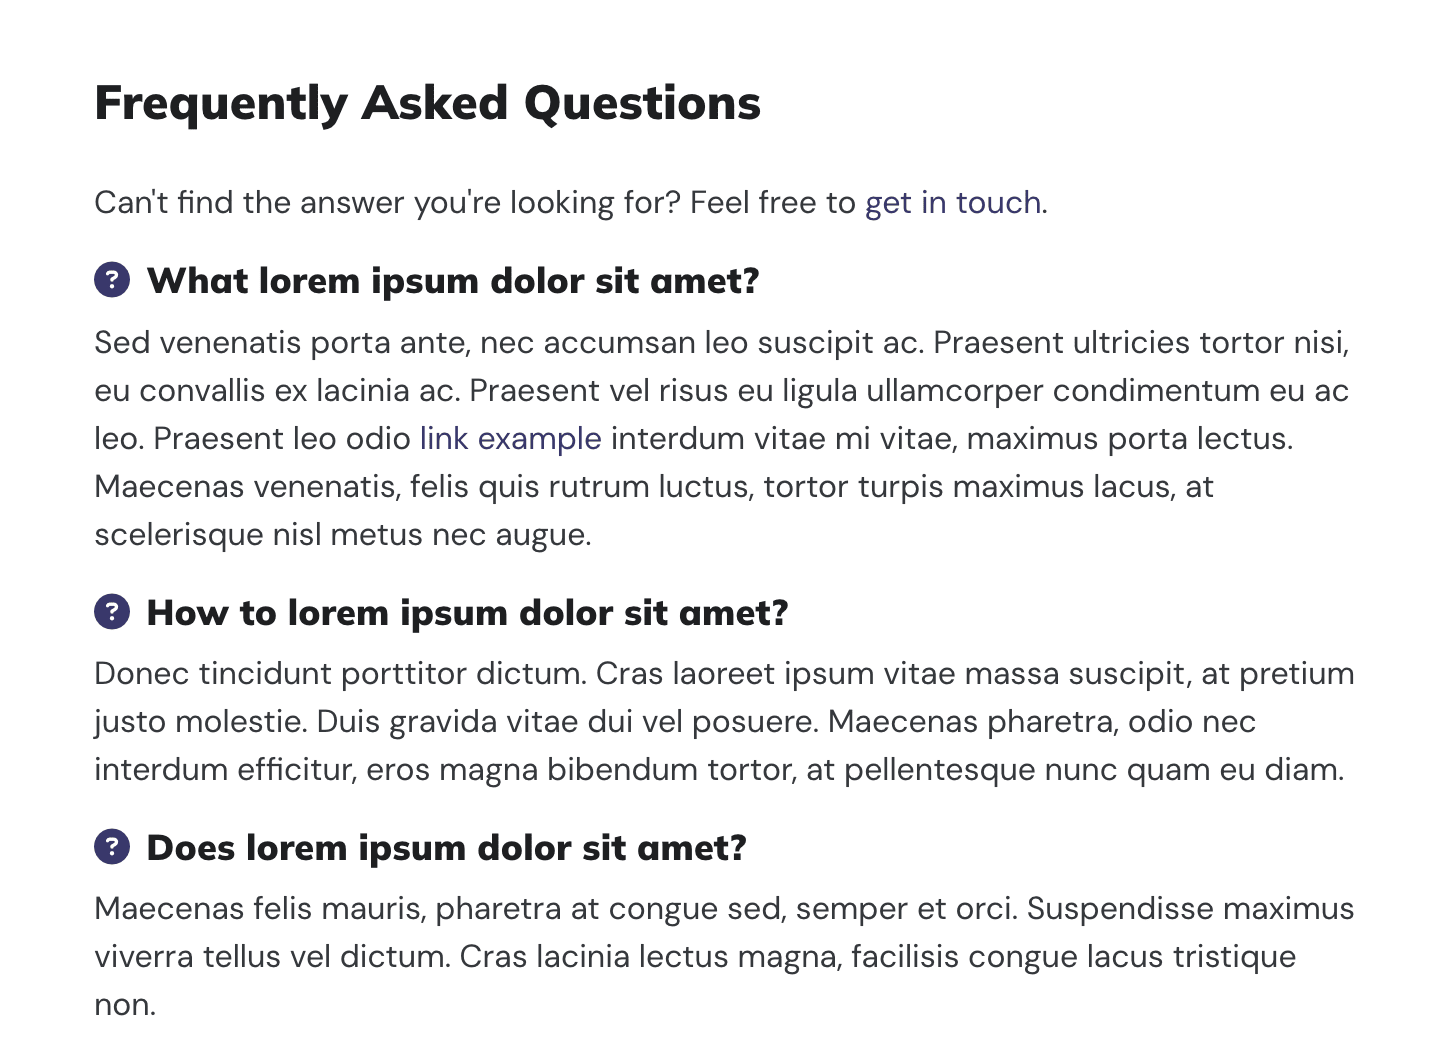
Course FAQ Section
You can list your course-specific FAQ in this section. If you want to create a site-wide FAQ page you can find out more here.
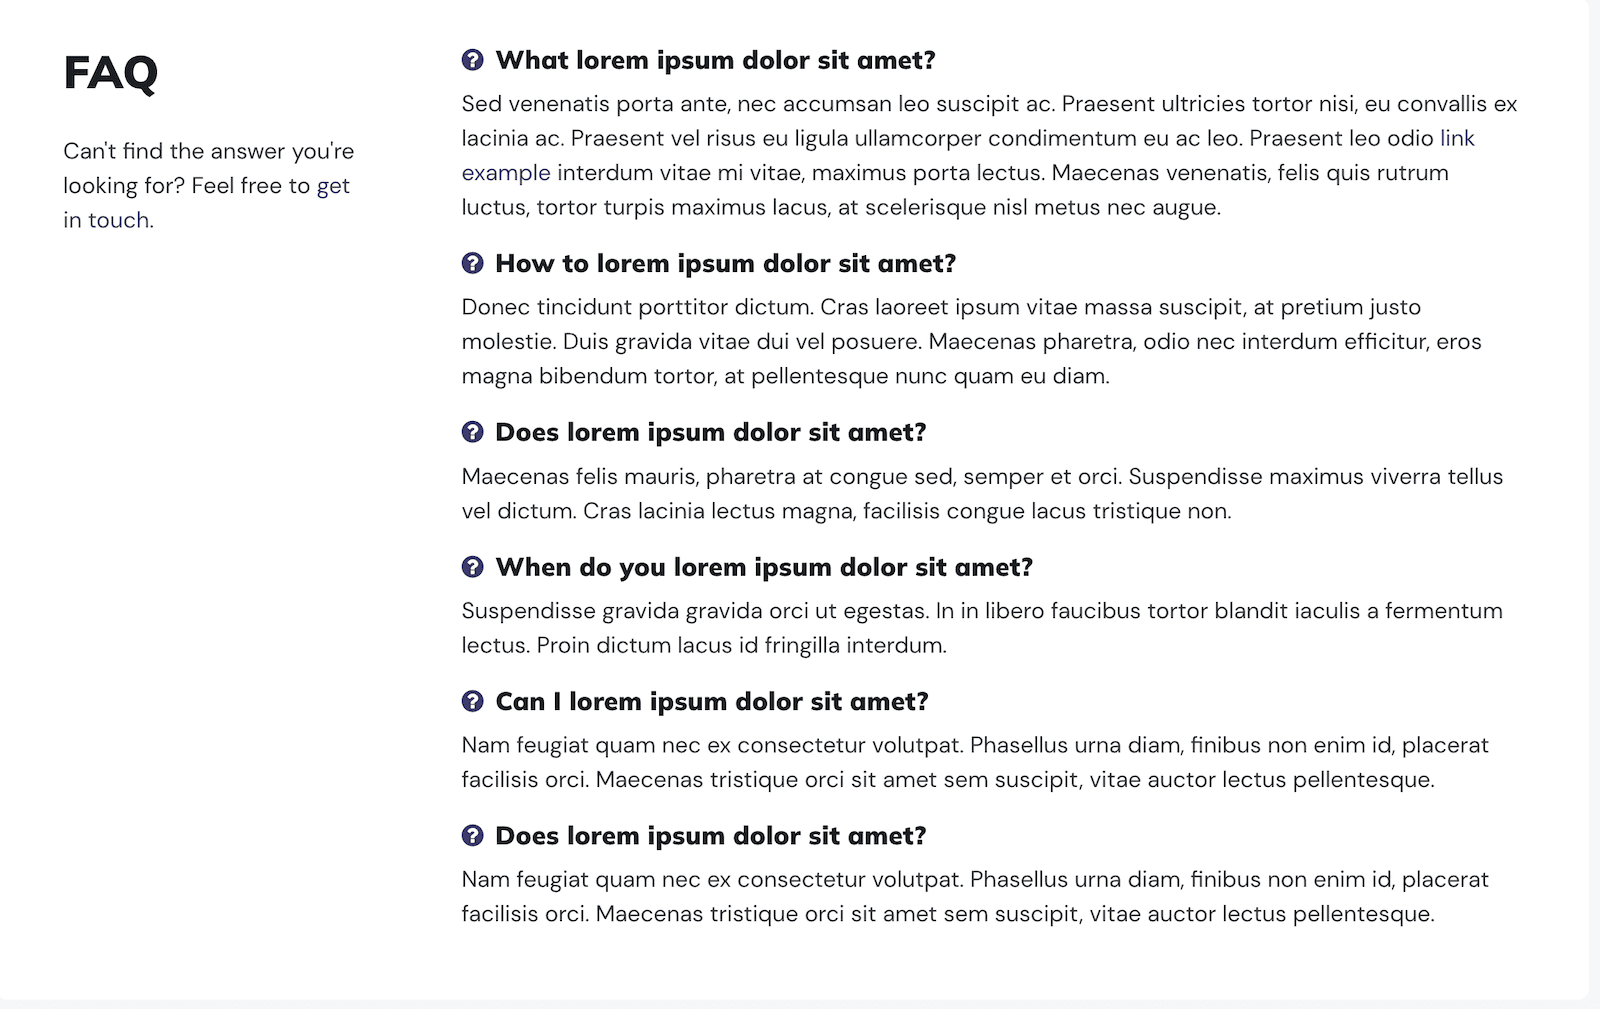
    <div class="course-faq-section section bg-white mb-5">
        <div class="container">
		        <div class="row">
			        <div class="col-12 col-lg-3">
				        <h3 class="section-title text-start mb-4">FAQ</h3>
				        <div class="intro mb-3 pr-lg-3">Can't find the answer you're looking for? Feel free to <a class="theme-link" href="#">get in touch</a>.</div>
			        </div>
			        <div class="col-12 col-lg-9">
				        <div class="faq-items pl-lg-3">
					        <div class="item">
								<h4 class="faq-q mb-2"><i class="icon fa fa-question-circle text-primary"></i>What lorem ipsum dolor sit amet?</h4>
								<div class="faq-a">
									<p>Sed venenatis porta ante, nec accumsan leo suscipit ac. Praesent ultricies tortor nisi, eu convallis ex lacinia ac. Praesent vel risus eu ligula ullamcorper condimentum eu ac leo. Praesent leo odio <a href="#">link example</a> interdum vitae mi vitae, maximus porta lectus. Maecenas venenatis, felis quis rutrum luctus, tortor turpis maximus lacus, at scelerisque nisl metus nec augue.  </p>
								</div>
							</div><!--//item-->
							<div class="item">
								<h4 class="faq-q mb-2"><i class="icon fa fa-question-circle text-primary"></i>How to lorem ipsum dolor sit amet?</h4>
								<div class="faq-a">
									<p>Donec tincidunt porttitor dictum. Cras laoreet ipsum vitae massa suscipit, at pretium justo molestie. Duis gravida vitae dui vel posuere. Maecenas pharetra, odio nec interdum efficitur, eros magna bibendum tortor, at pellentesque nunc quam eu diam. </p>
								</div>
							</div><!--//item-->
							<div class="item">
								<h4 class="faq-q mb-2"><i class="icon fa fa-question-circle text-primary"></i>Does lorem ipsum dolor sit amet?</h4>
								<div class="faq-a">
									<p>Maecenas felis mauris, pharetra at congue sed, semper et orci. Suspendisse maximus viverra tellus vel dictum. Cras lacinia lectus magna, facilisis congue lacus tristique non. </p>
								</div>
							</div><!--//item-->
							<div class="item">
								<h4 class="faq-q mb-2"><i class="icon fa fa-question-circle text-primary"></i>When do you lorem ipsum dolor sit amet?</h4>
								<div class="faq-a">
									<p>Suspendisse gravida gravida orci ut egestas. In in libero faucibus tortor blandit iaculis a fermentum lectus. Proin dictum lacus id fringilla interdum.  </p>
								</div>
							</div><!--//item-->
							<div class="item">
								<h4 class="faq-q mb-2"><i class="icon fa fa-question-circle text-primary"></i>Can I lorem ipsum dolor sit amet?</h4>
								<div class="faq-a">
									<p>Nam feugiat quam nec ex consectetur volutpat. Phasellus urna diam, finibus non enim id, placerat facilisis orci. Maecenas tristique orci sit amet sem suscipit, vitae auctor lectus pellentesque. </p>
								</div>
							</div><!--//item-->
							<div class="item">
								<h4 class="faq-q mb-2"><i class="icon fa fa-question-circle text-primary"></i>Does lorem ipsum dolor sit amet?</h4>
								<div class="faq-a">
									<p>Nam feugiat quam nec ex consectetur volutpat. Phasellus urna diam, finibus non enim id, placerat facilisis orci. Maecenas tristique orci sit amet sem suscipit, vitae auctor lectus pellentesque. </p>
								</div>
							</div><!--//item-->
				        </div><!--//faq-items-->
			        </div><!--//col-->
		        </div><!--//row-->
        </div><!--//container-->
    </div><!--//course-faq-section-->
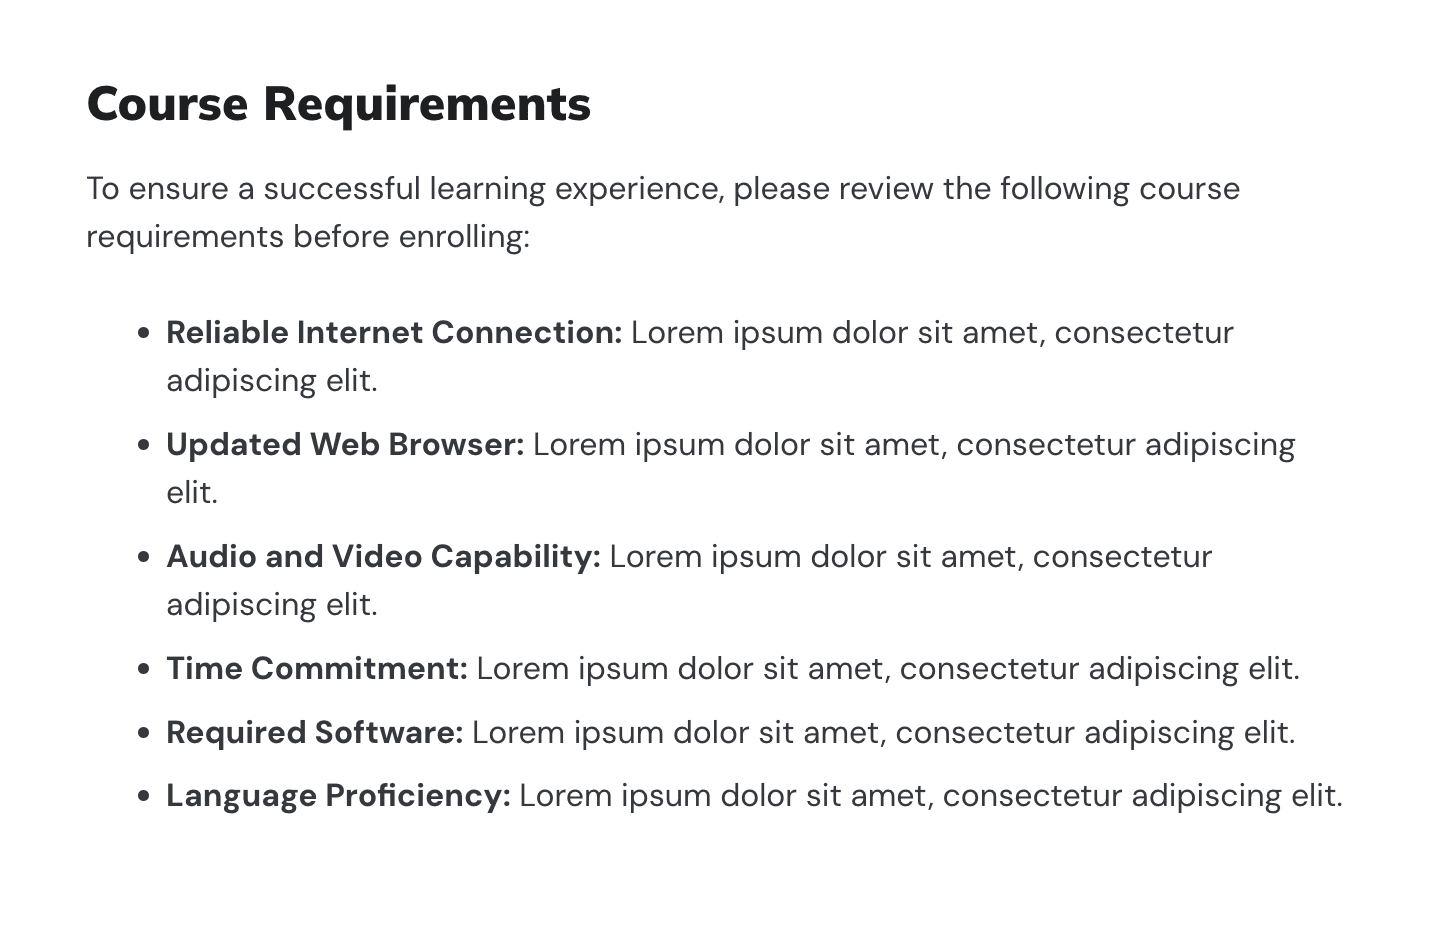
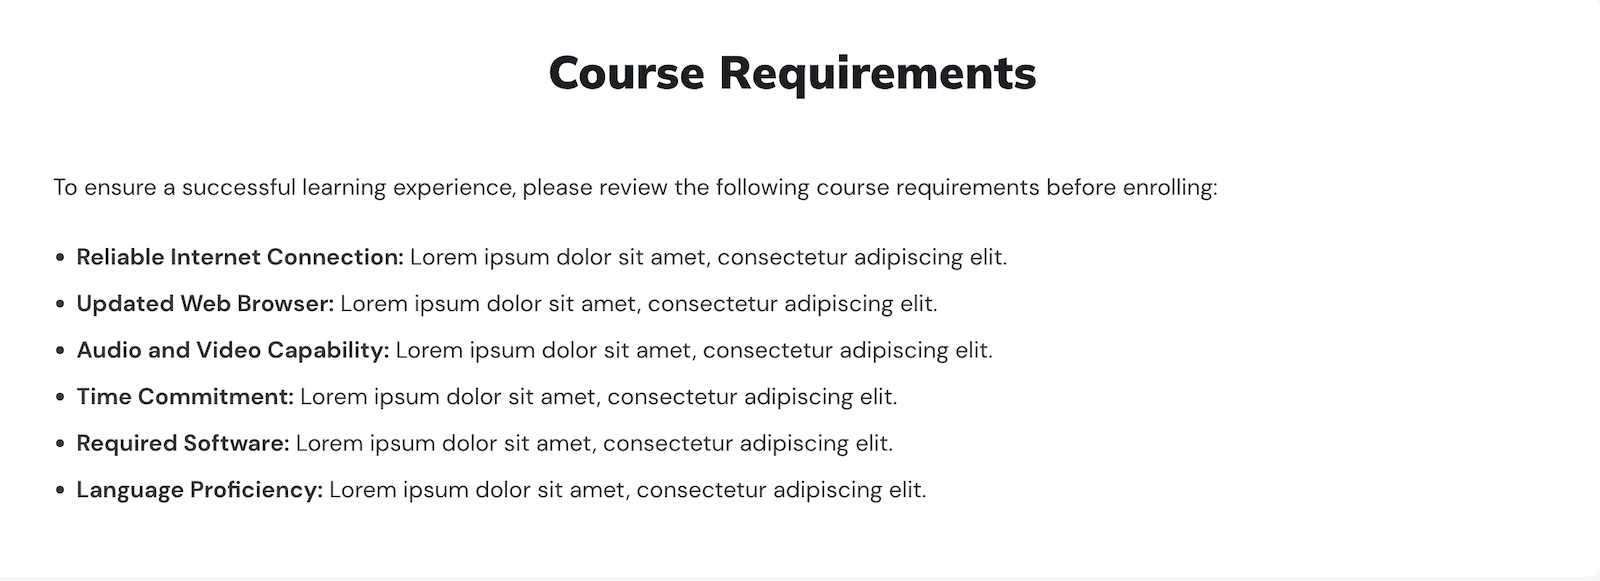
Course Requirements Section
If your course has prerequisites for learners you can list them in this section.
    <div class="course-requirements-section section bg-white mb-5">
	    <div class="container">
		    <h2 class="section-title text-center mb-5">Course Requirements</h2>
		    <div class="section-intro mb-4">
			    <p>To ensure a successful learning experience, please review the following course requirements before enrolling:</p>
		    </div>
		    <ul class="section-list mx-auto text-left">
			    <li><strong>Reliable Internet Connection:</strong> Lorem ipsum dolor sit amet, consectetur adipiscing elit.</li>
			    <li><strong>Updated Web Browser:</strong> Lorem ipsum dolor sit amet, consectetur adipiscing elit.</li>
			    <li><strong>Audio and Video Capability:</strong>  Lorem ipsum dolor sit amet, consectetur adipiscing elit.</li>
			    <li><strong>Time Commitment:</strong>  Lorem ipsum dolor sit amet, consectetur adipiscing elit.</li>
			    <li><strong>Required Software:</strong>  Lorem ipsum dolor sit amet, consectetur adipiscing elit.</li>
			    <li><strong>Language Proficiency:</strong>  Lorem ipsum dolor sit amet, consectetur adipiscing elit.</li>
		    </ul>
	    </div><!--//container-->
    </div><!--//course-requirements-section-->
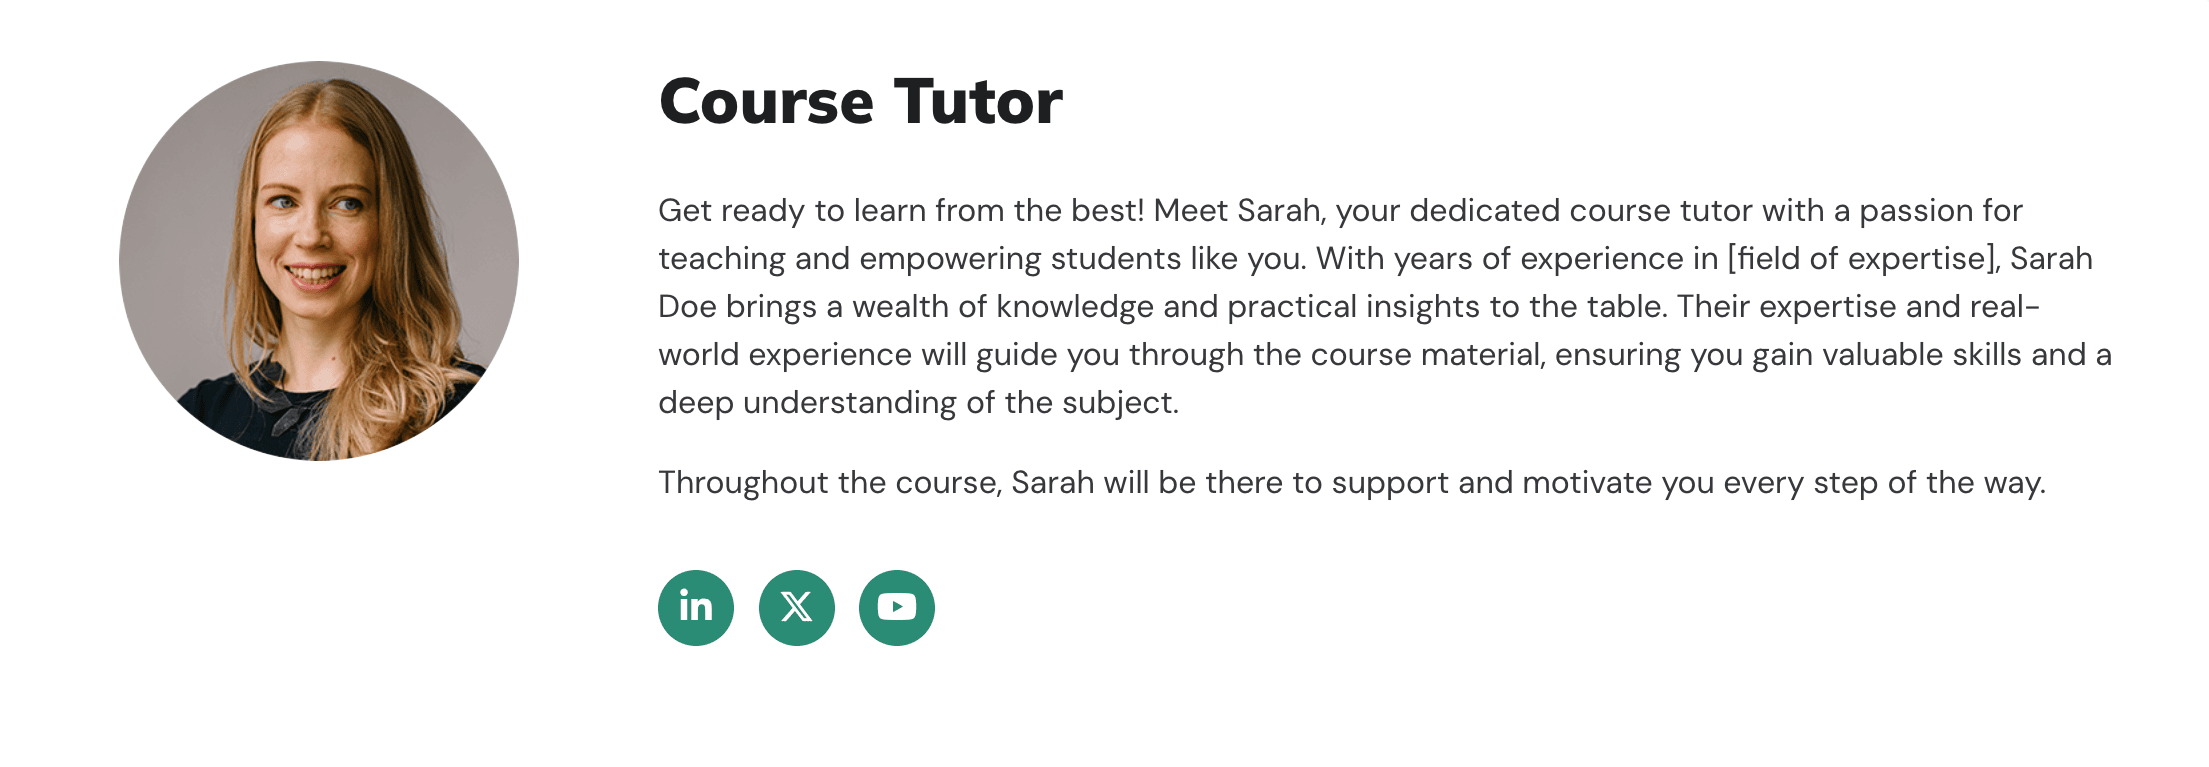
Course Tutor Section
You can provide your course tutor or instructor’s bio information in this section.
    <div class="course-tutor-section section bg-white mb-5">
	    <div class="container">
		    <div class="row">
		        <div class="col-12 col-lg-3">
			        <div class="tutor-img-holder mb-5 mb-lg-0 text-center">
				        <img class="tutor-profile img-fluid rounded-circle" src="https://3rdwavemedia.com/demo-images/teachers/tutor-1.png" alt="">
			        </div><!--//tutor-img-holder-->
		        </div><!--//col-->
		        <div class="col-12 col-lg-9">
			        <div class="pl-lg-4">
				        <h3 class="section-title text-center text-lg-left mb-4 ">Course Tutor</h3>
				        <p>Get ready to learn from the best! Meet Sarah, your dedicated course tutor with a passion for teaching and empowering students like you.

With years of experience in [field of expertise], Sarah Doe brings a wealth of knowledge and practical insights to the table. Their expertise and real-world experience will guide you through the course material, ensuring you gain valuable skills and a deep understanding of the subject.</p>

			            <p>Throughout the course, Sarah will be there to support and motivate you every step of the way.</p>
			             <div class="text-center text-lg-left">
				         <ul class="social-list list-unstyled py-3">
						<li class="list-inline-item"><a href="#"><i class="icon fa-brands fa-linkedin-in"></i></a></li>
						<li class="list-inline-item"><a href="#"><i class="icon fa-brands fa-x-twitter"></i></a></li>
						<li class="list-inline-item"><a href="#"><i class="icon fa-brands fa-youtube"></i></a></li>
					 </ul><!--//social-list-->
			            </div>
                    </div>
		        </div><!--//col-->
	        </div><!--//row-->
	    </div><!--//container-->
    </div><!--//course-tutor-section-->
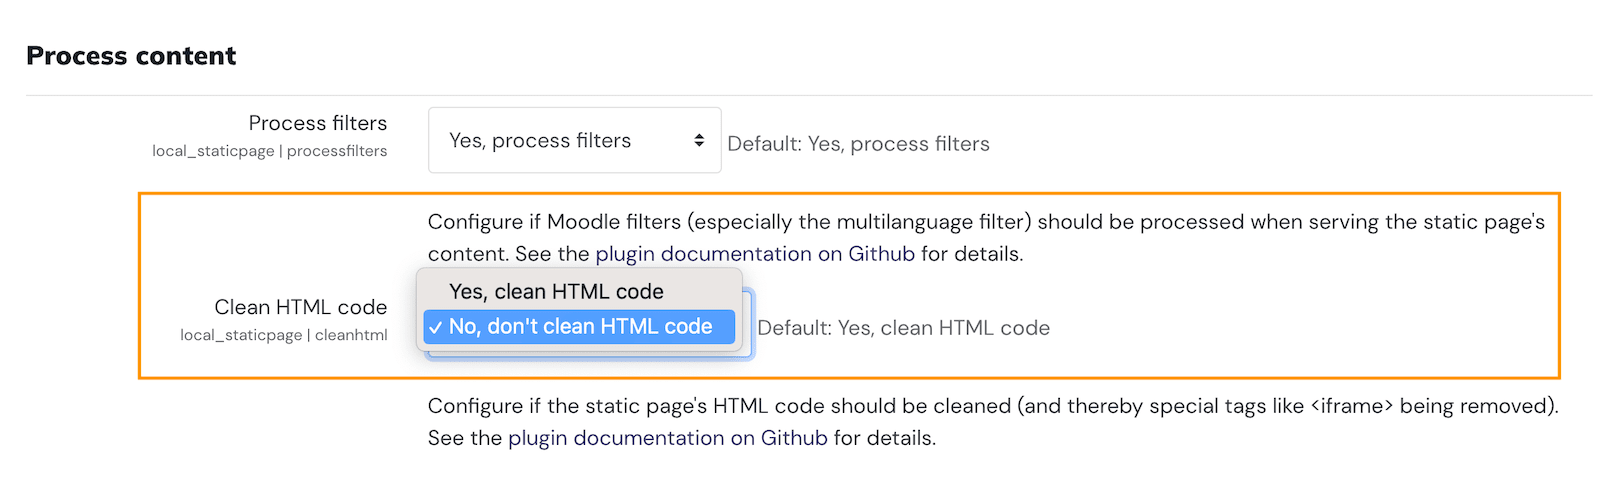
Step 2
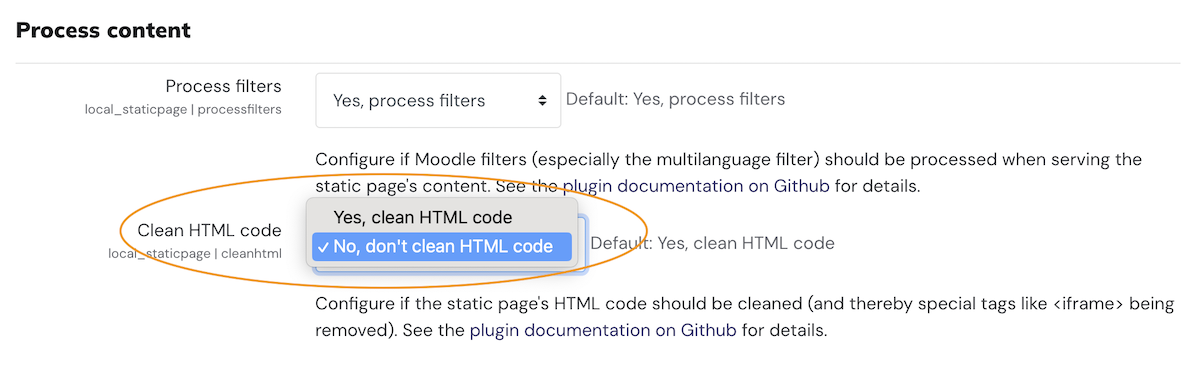
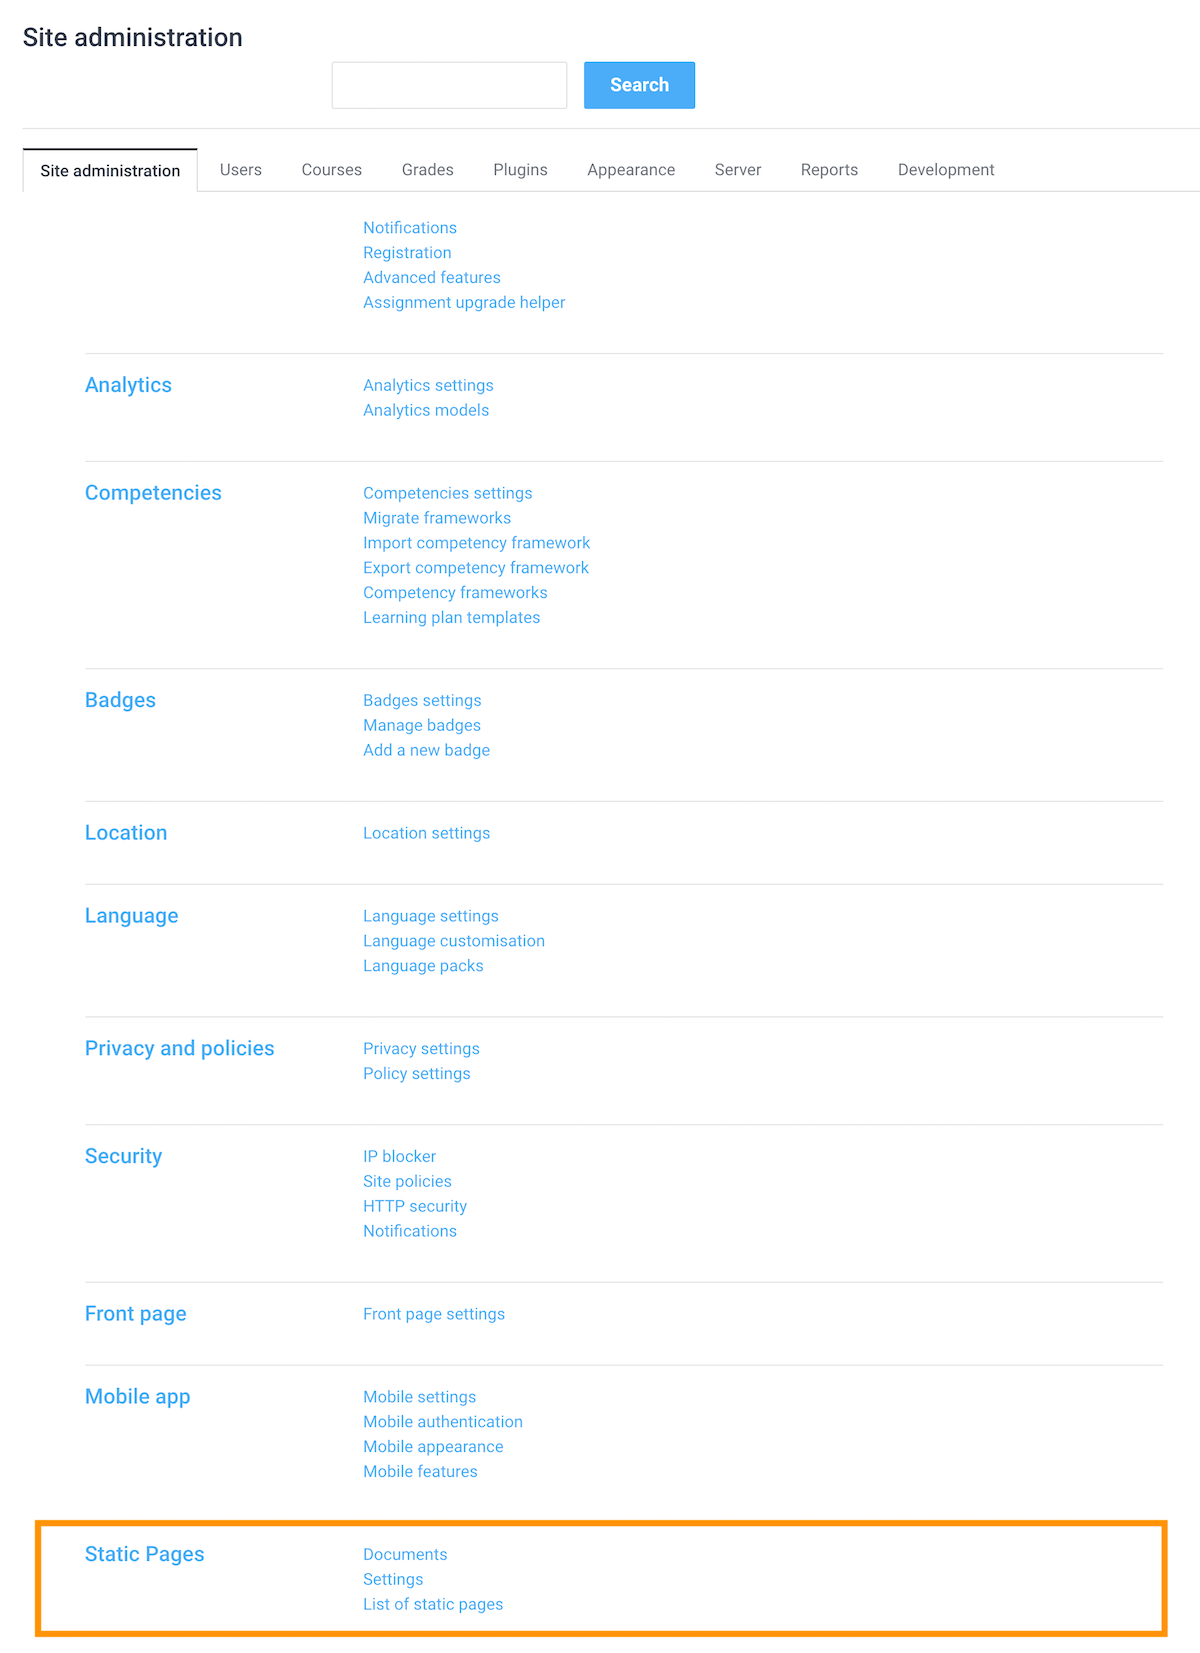
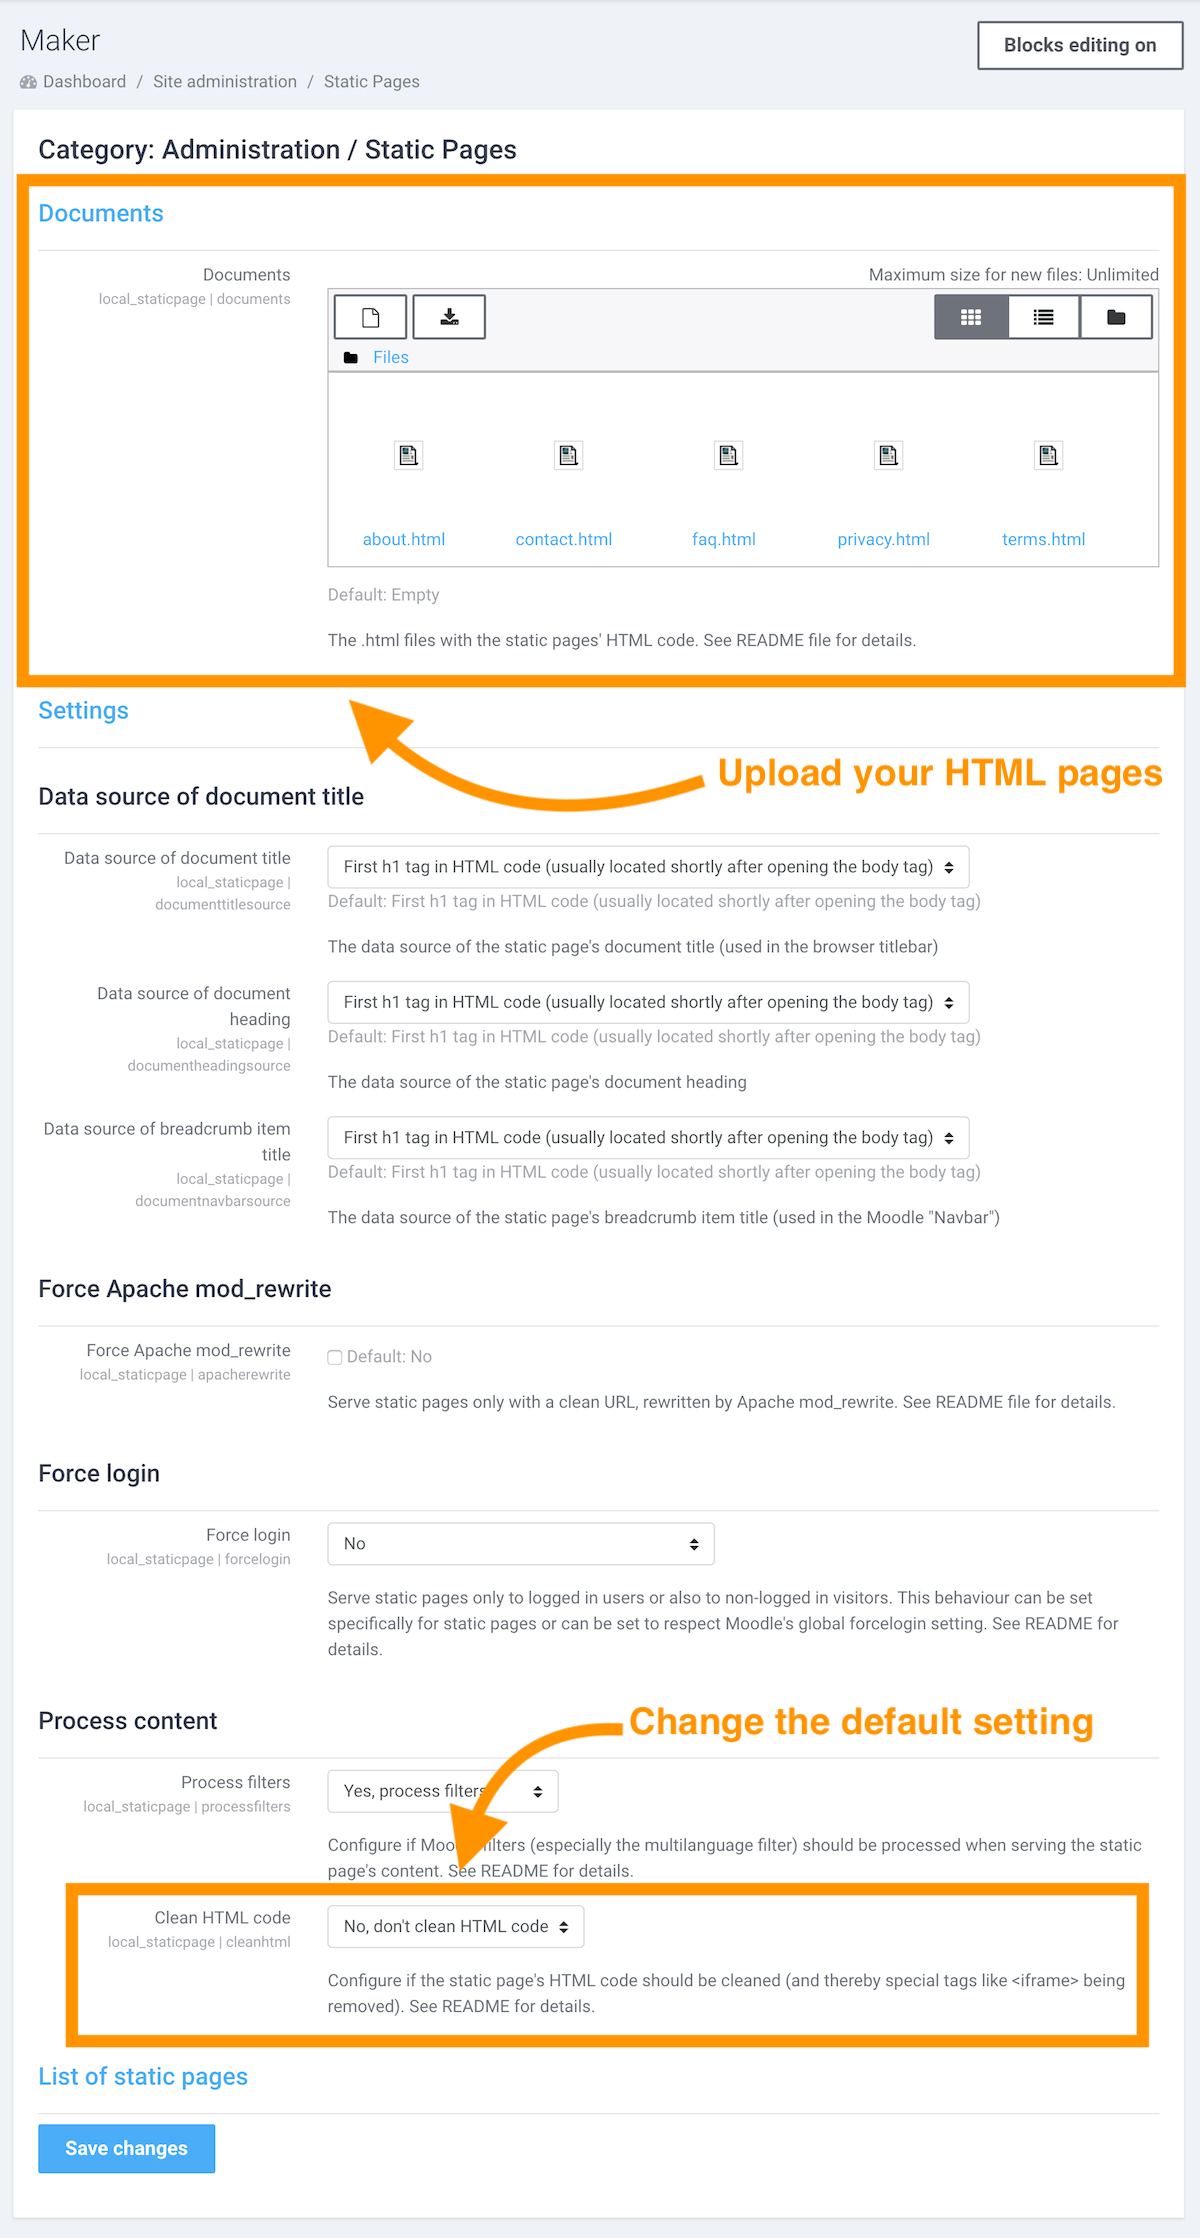
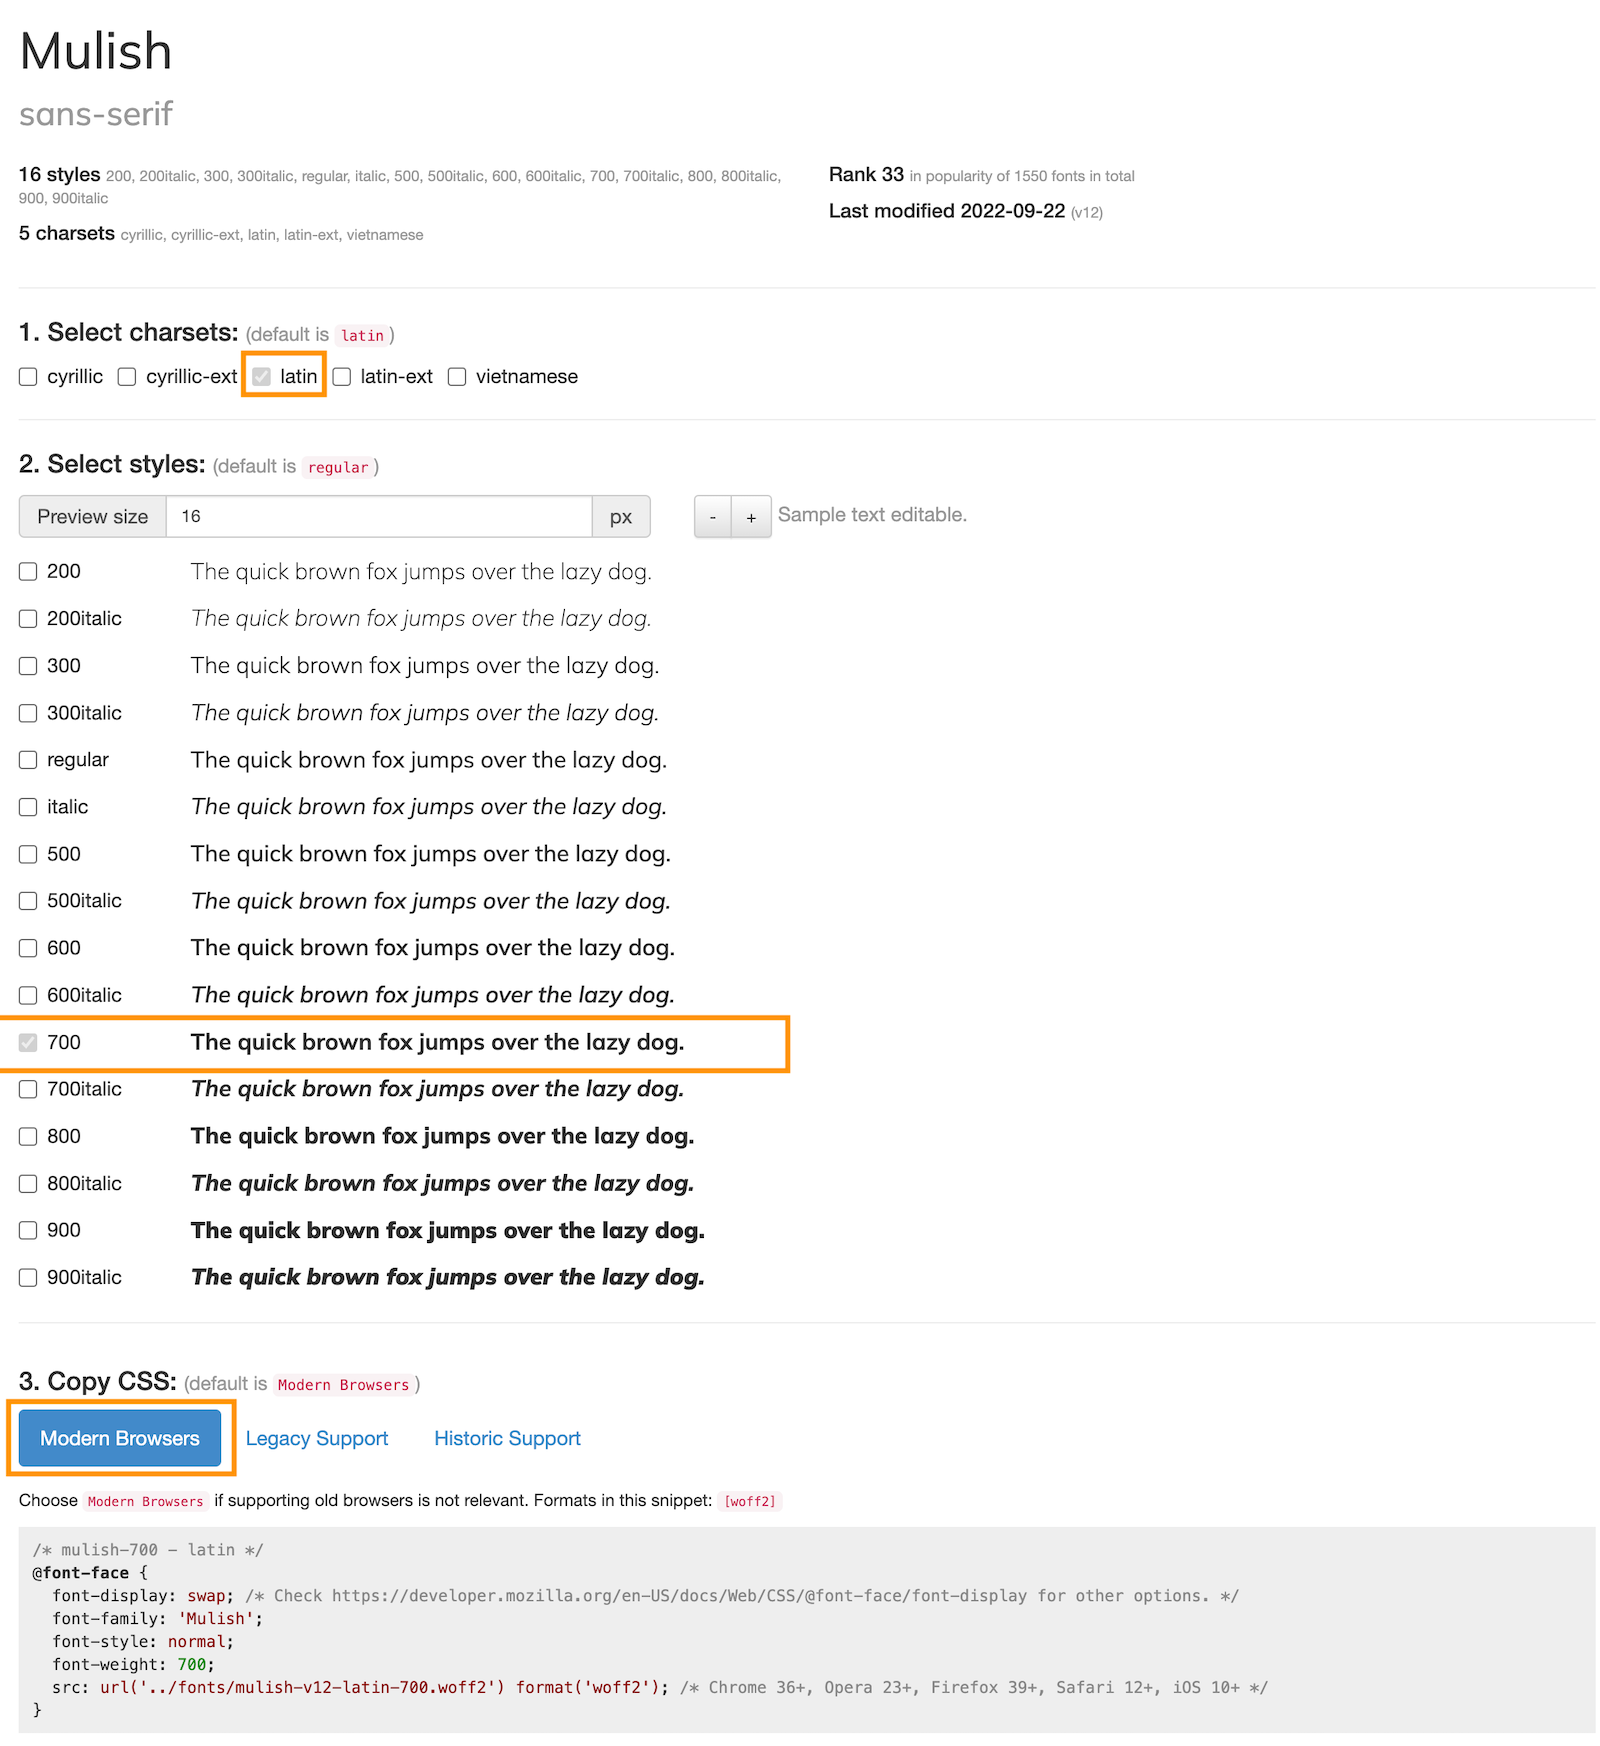
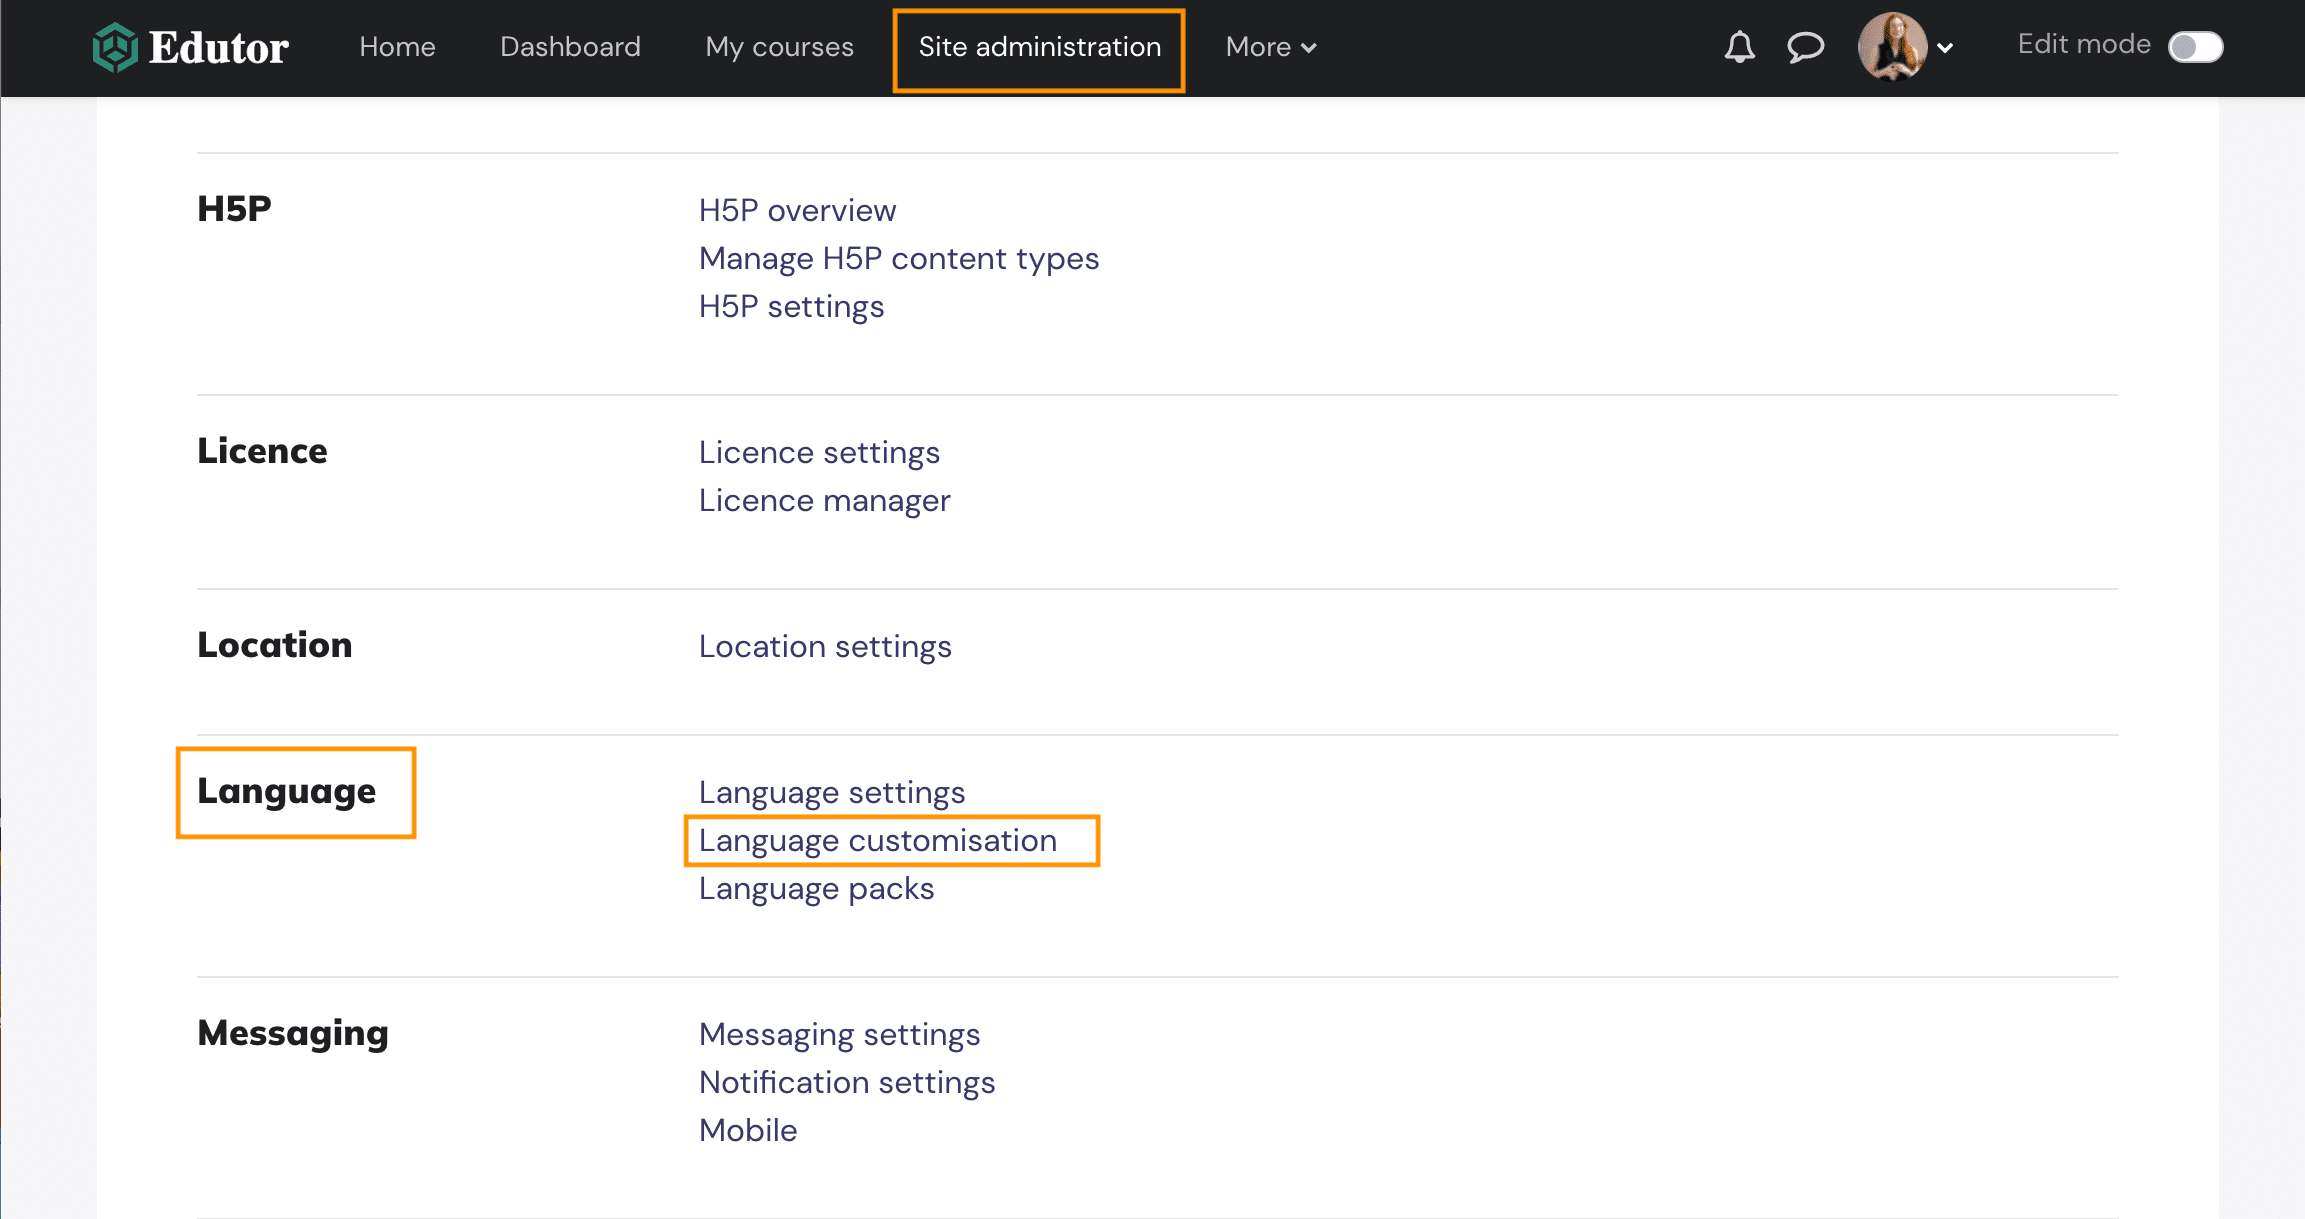
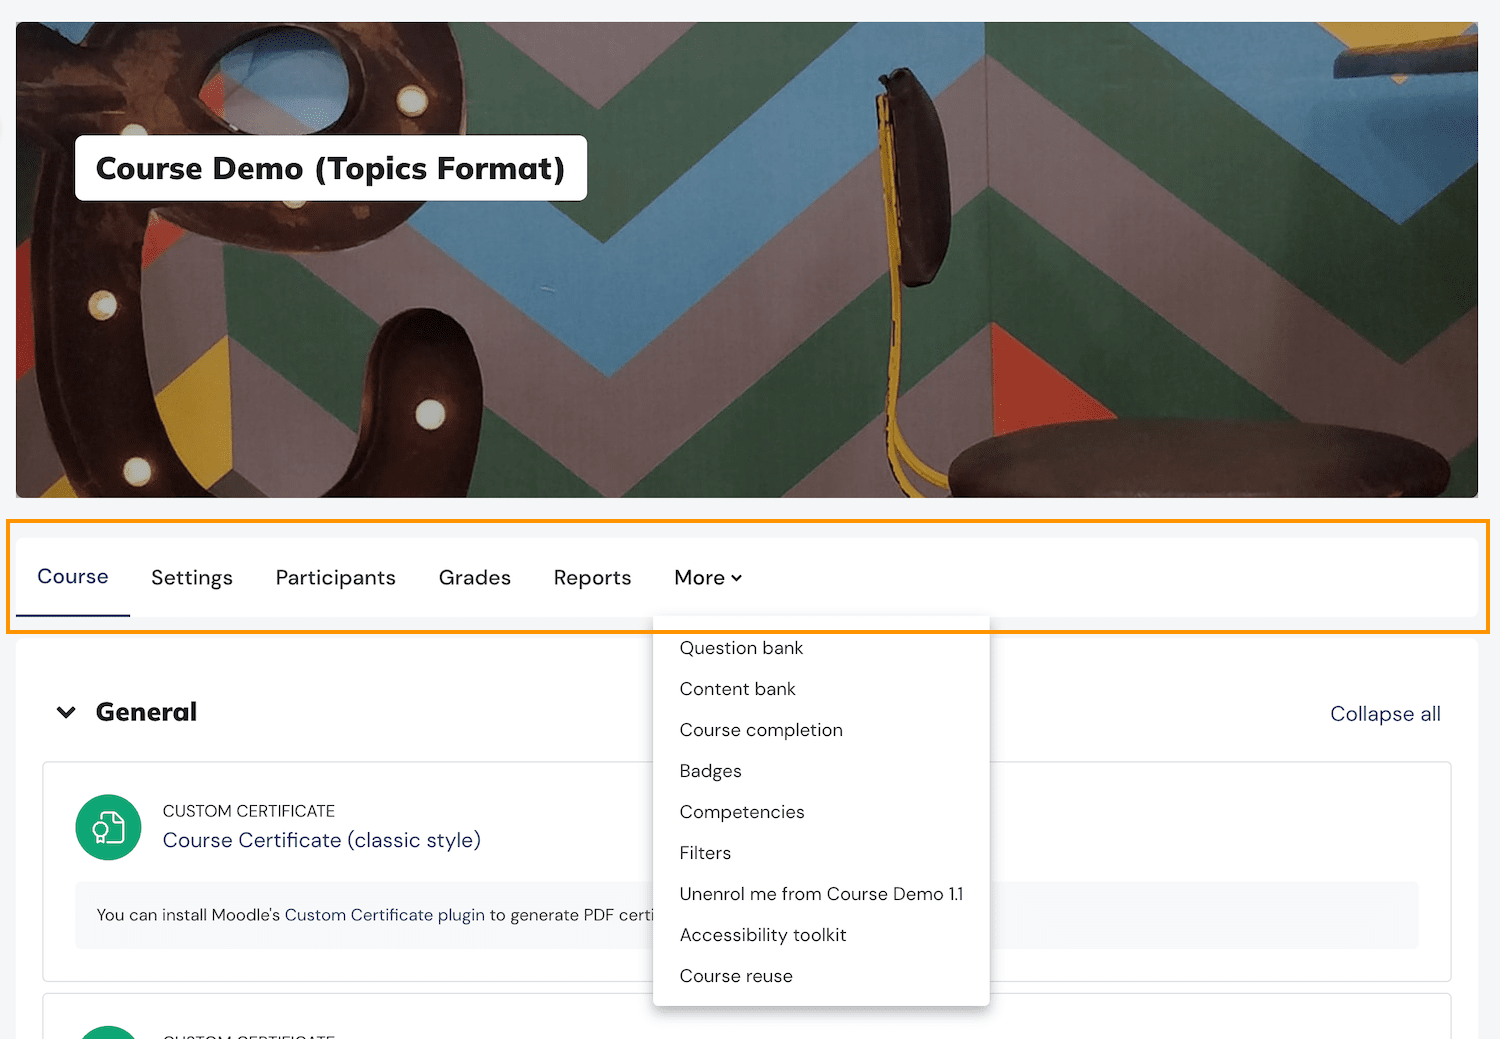
Download and install Moodle’s Static Pages plugin. Make sure the plugin doesn’t clean your HTML code. You need to change this setting after installing as shown in the figure below.
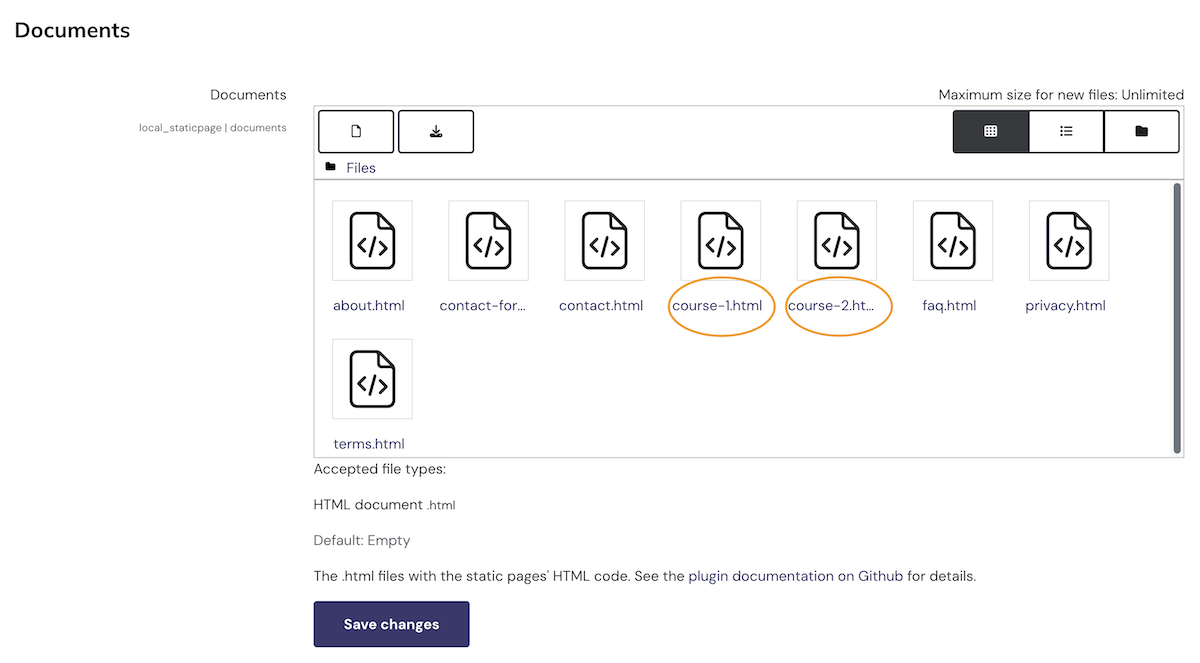
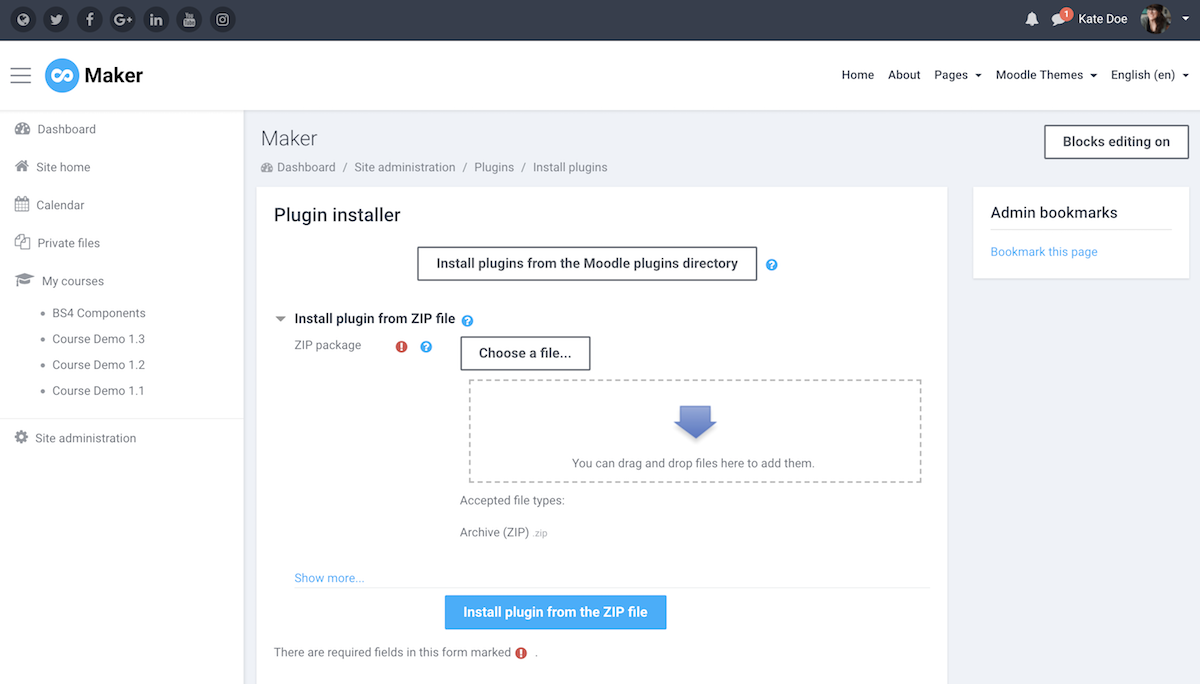
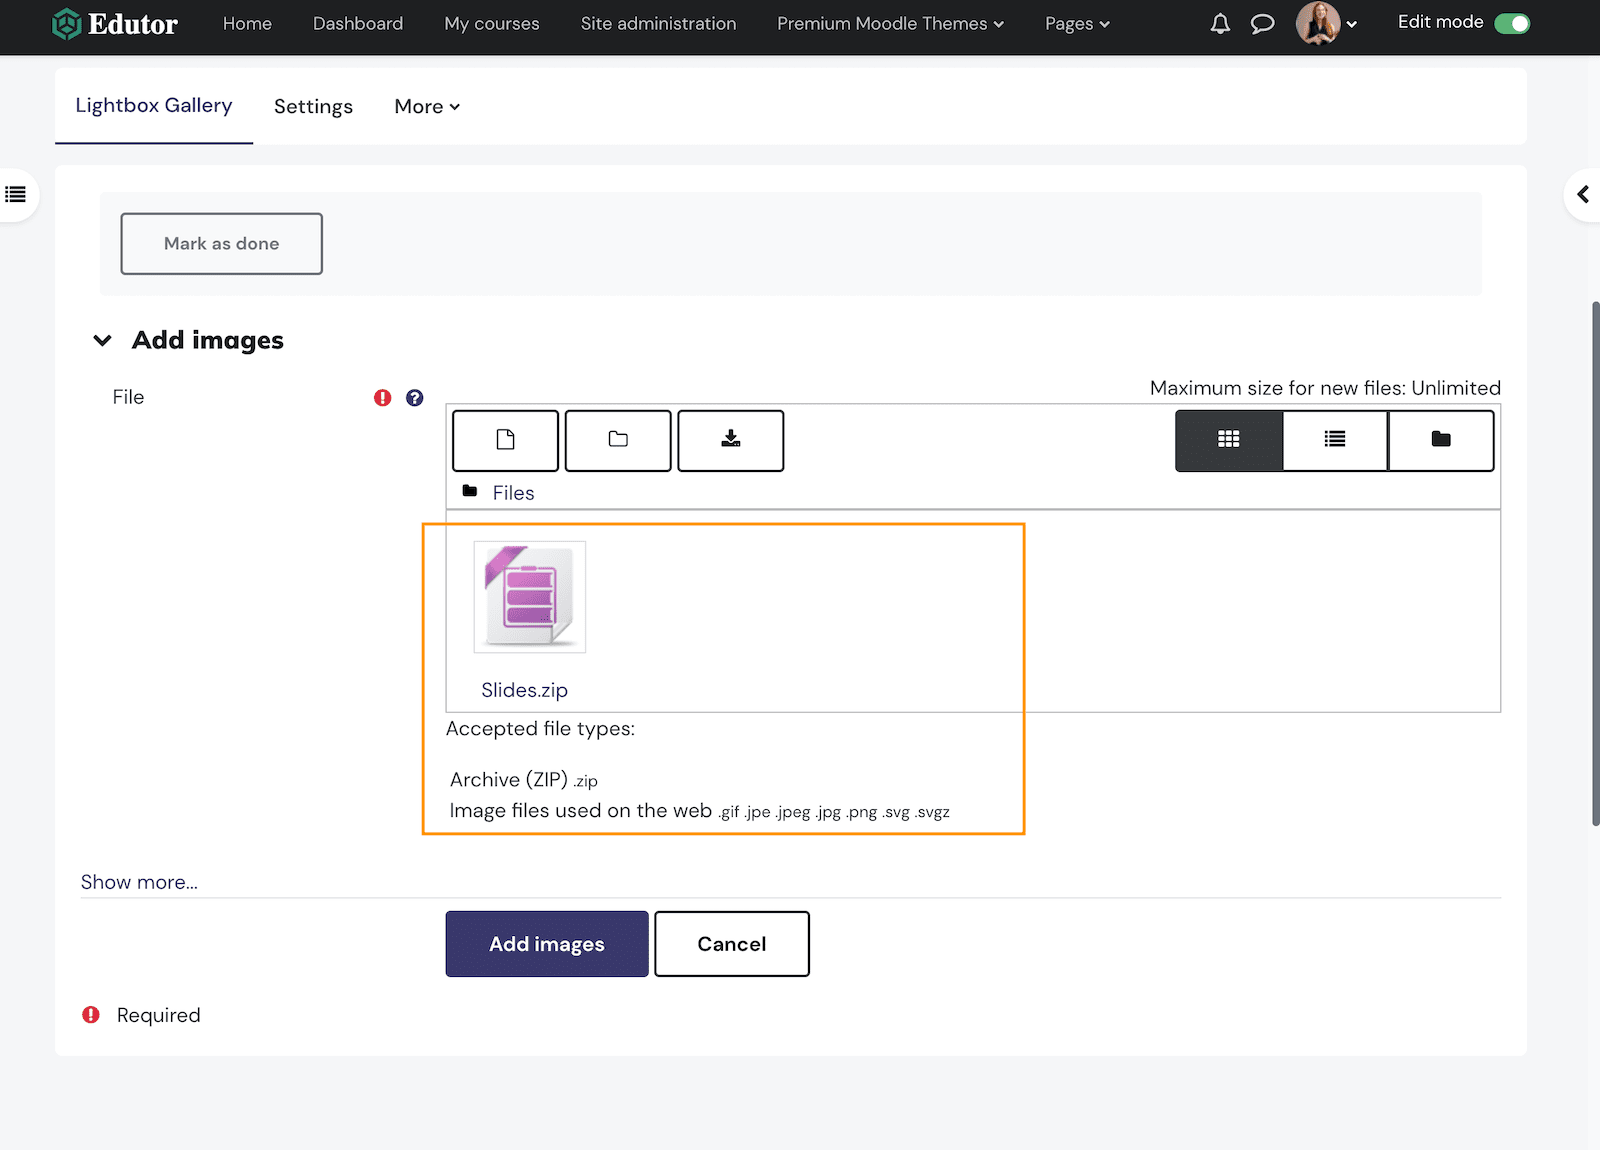
Upload the course landing page HTML file to the plugin’s “Documents” page.
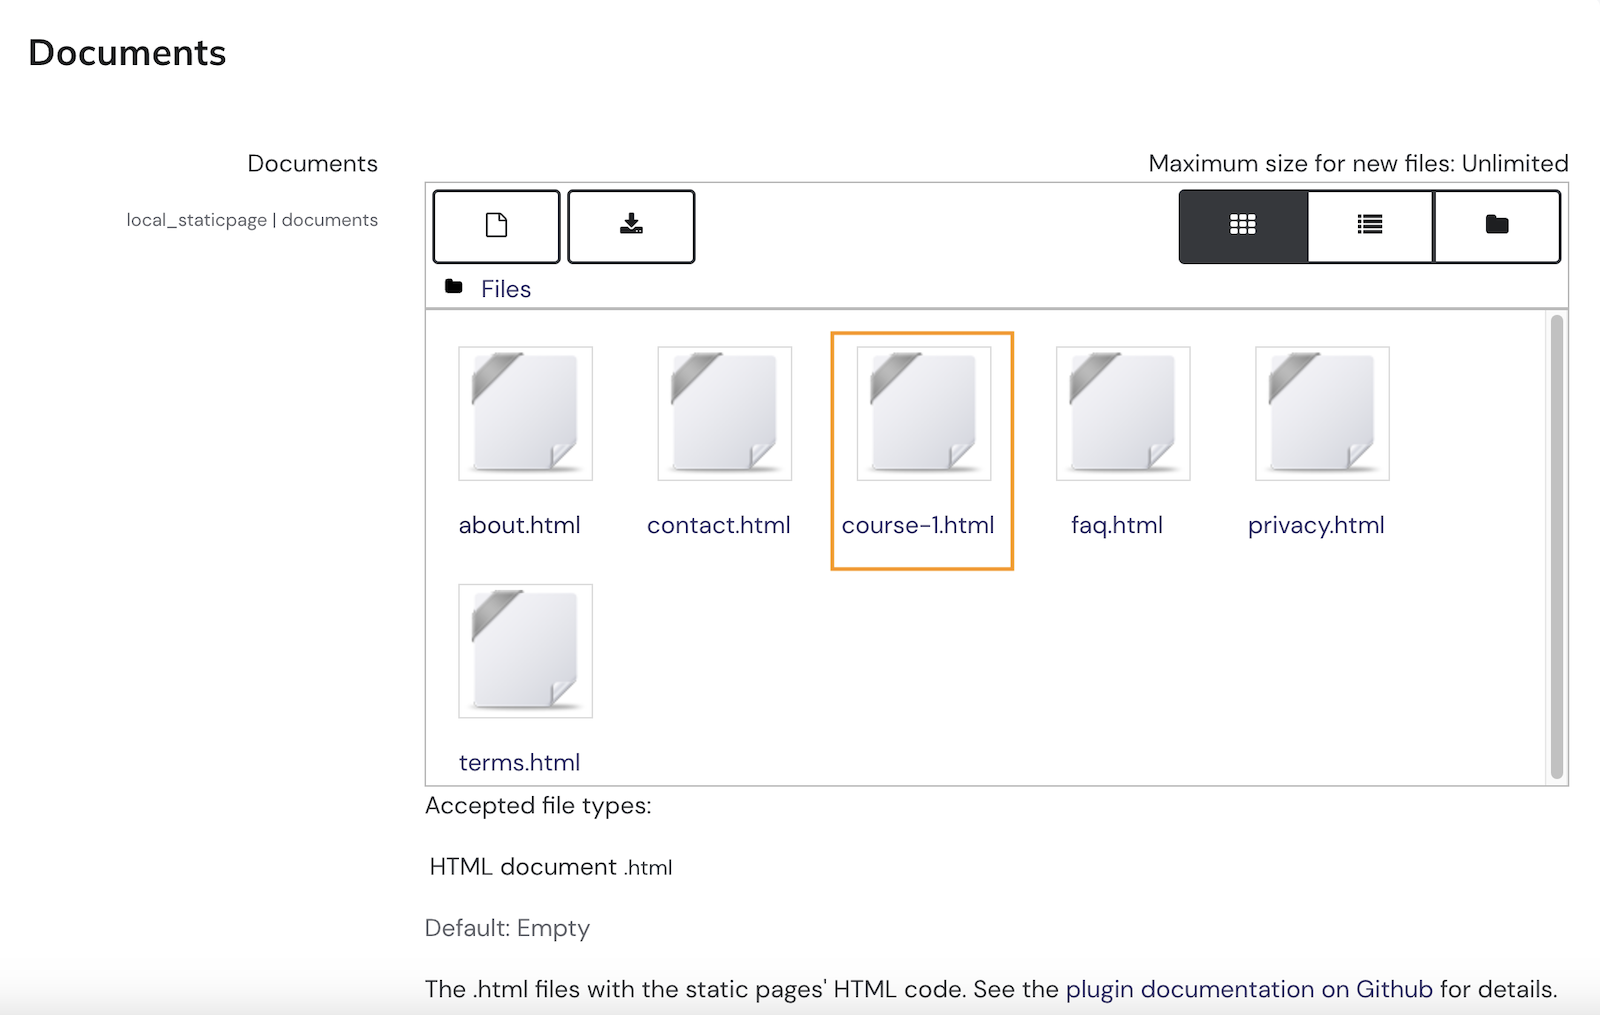
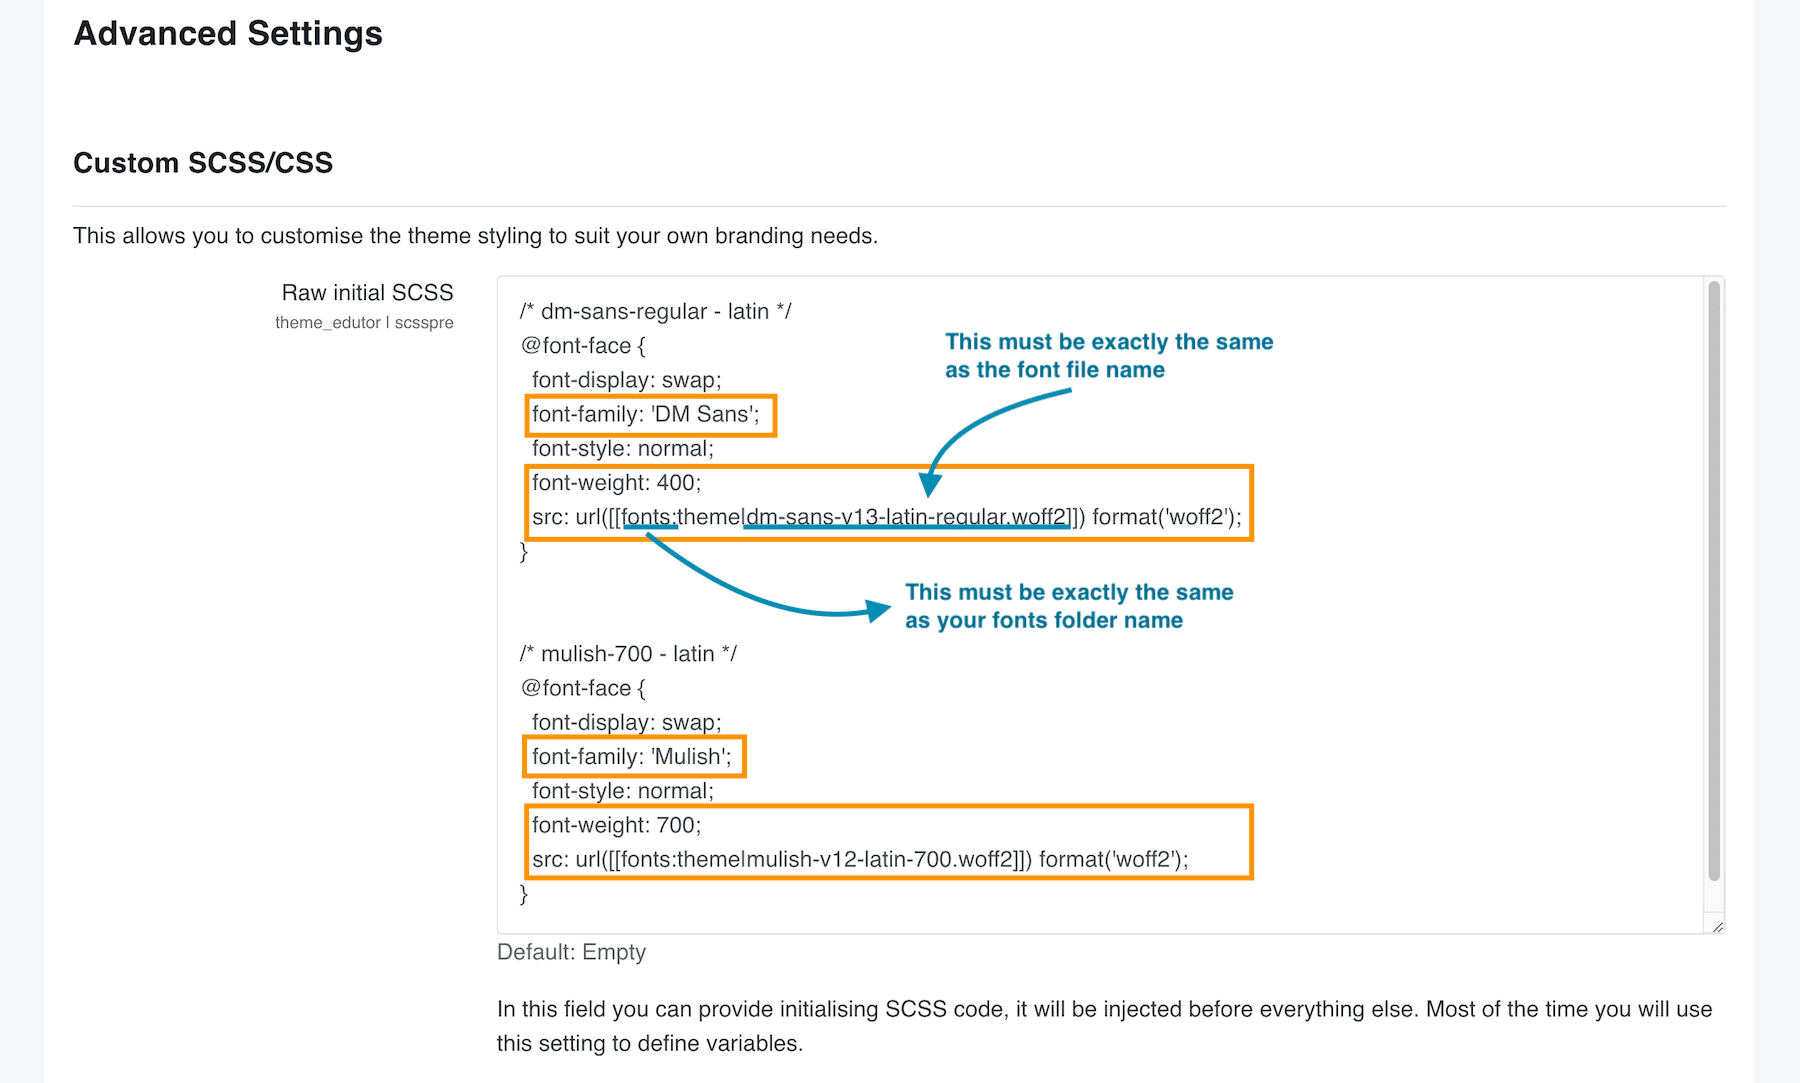
You can make multiple course landing pages using this template but the HTML file name must start with course (eg. course-1.html or course-a.html) to have the correct styling applied in our Edutor and Maker theme.
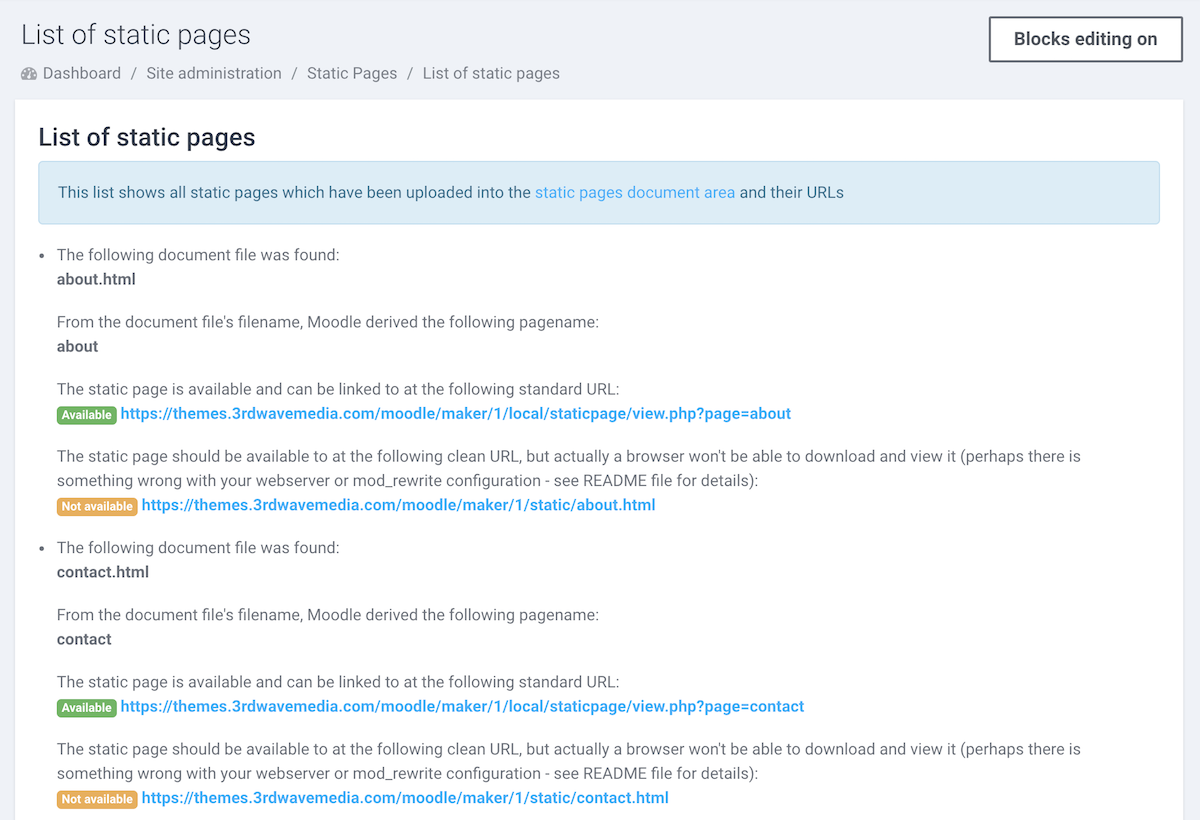
Step 3
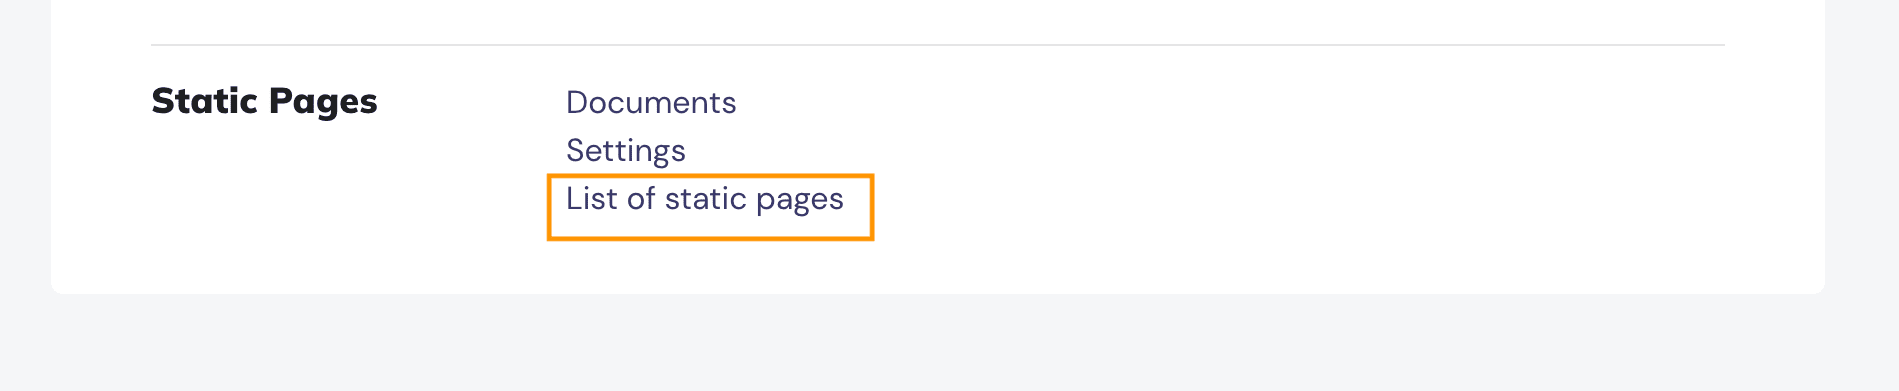
After uploading the HTML page, you can get the page URL from the “List of static pages” page.
You can then add the page link to your Moodle site’s custom menu.